


第67節 - Unity: C# Delegates & Events
這一節我會介紹Unity: C# Delegates & Events,這一節主要介紹以下內容:
1: What is Delegate?
2: Simple Delegate
3: Mulitcast Delegate
4: Delegate & Event
5: Polling VS Event Driven Input
6: Conclusion
1.0) What is Delegate?
以下列出一些delegate的功能和特性:
- delegate(委派)是衍生自.NET中的Delegate類別(Class),它把方法(Method)當作型態(type)來運用,delegate讓我們可以把Method透過參數(Parameter)的形式傳入其他方法來運用。
- delegate定義一個reference type(參考型別),再指向一個Method(方法)。與類別相似,例如: ClassA a = new ClassA();,建立一個Class A reference a,並指向一個類別物件new ClassA();。
- delegate能夠擁有一個簽名(signature),並且它只能持有與它的簽名相同的方法的引用。
- delegate大致類似C++的Function Pointer(函式指標),但是,delegate又具有安全性(Type-Safe) 。
- delegate定義一個reference type,它可以encapsulate(封裝)一個或多個方法。
- delegate可用來encapsulate(封裝)具名方法或匿名方法(Anonymous Method)。
1.1) Reference to Mehthod(s)
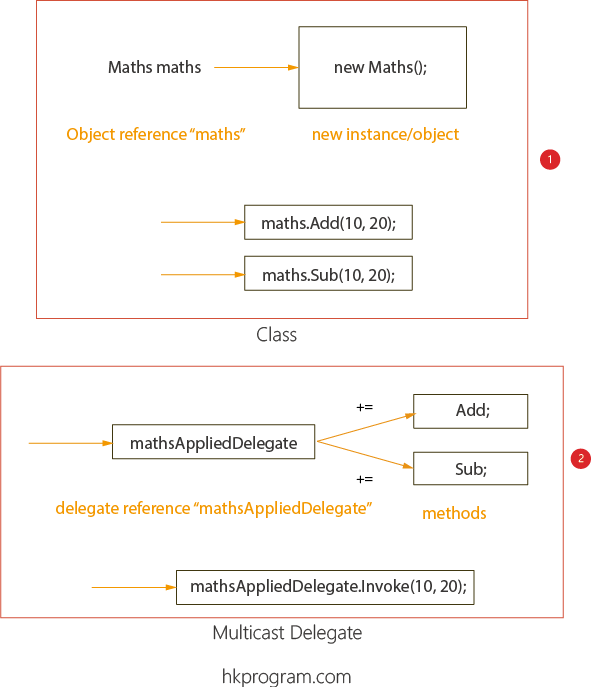
以下列出Class(類別)和delegate(委派)如何建立reference(參考)的分別,Class reference maths指向類別物件(object/instance),而delegate reference mathsAppliedDelegate就指向方法(method):
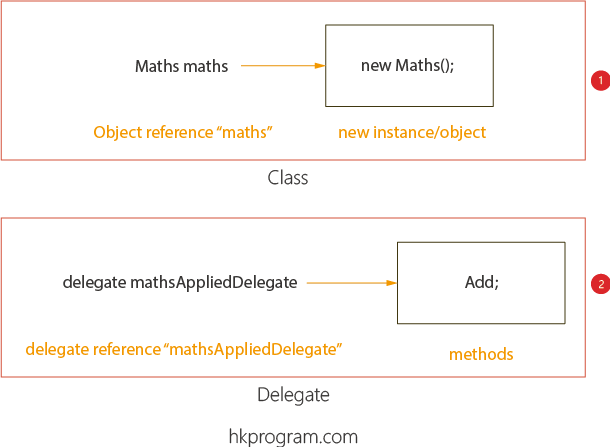
- Class reference maths指向類別物件(object/instance)。
- delegate reference mathsAppliedDelegate就指向方法(method)。
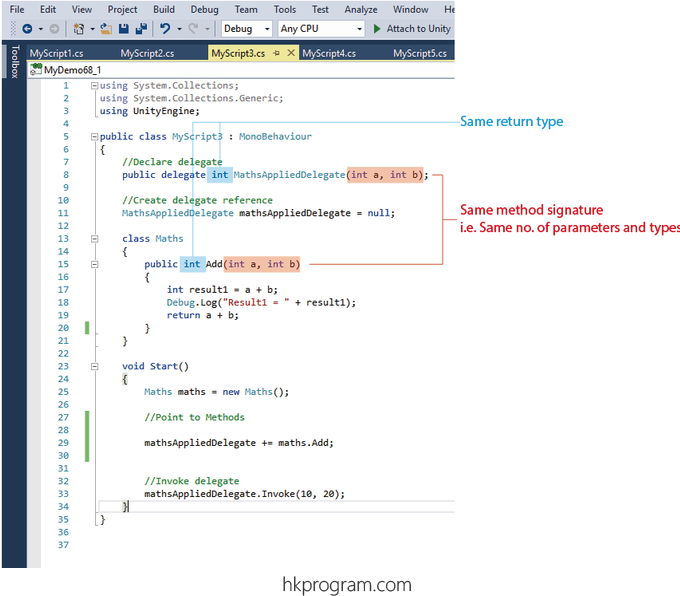
1.2) Same Signature & Type Safe
宣告delegate後,有關的Method(方法)須要遵守與delegate相同的Return Type和Parameter(s)的數目,如下圖:
以下介紹一個簡單Type Safe例子:
- 建立一個新的Script。
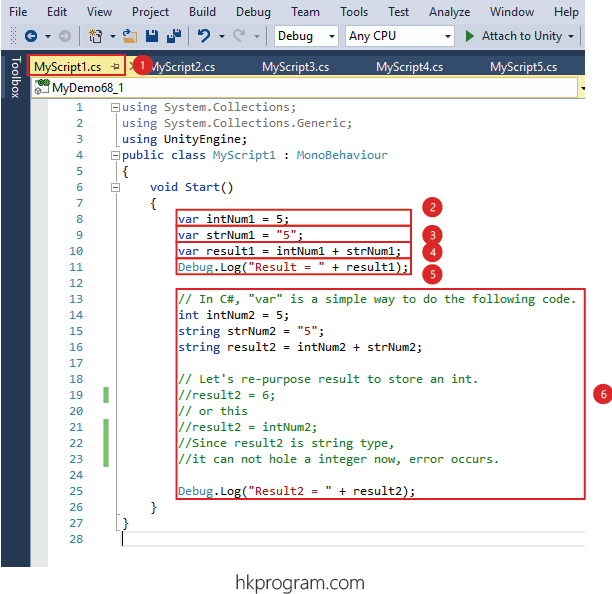
- 建立一個(Variable)變數intNum1,注意: C#的var代表自動根據intNum1 = 5,把intNum1預設為integer(整數)。
- 建立一個(Variable)變數strNum1,注意: C#的var代表自動根據strNum1 = "5",把strNum1預設為string(字串)。
- 建立一個(Variable)變數result1,注意: C#的var代表自動根據result1 = intNum1 + strNum1,把result1預設為string(字串)。
- 顯示result1的結果。
- 注意: 如果不用C#的var,可以直接用上代整數int和字串string,執行結果一樣。
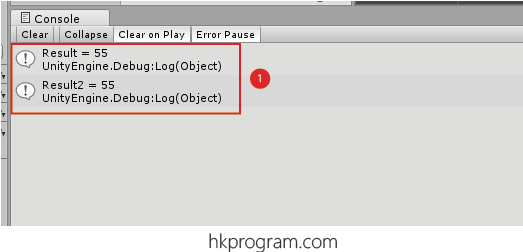
- 執行結果一樣。
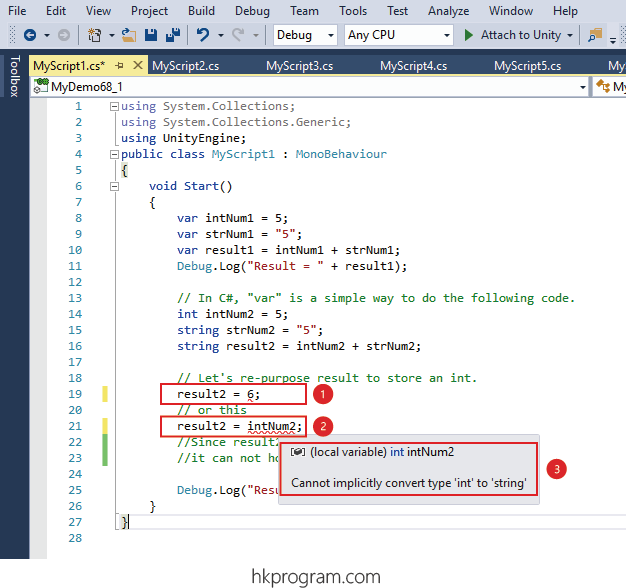
- 因為result2已經定義為字串,如果把一個整數設定給result2,Error Message就會出現。
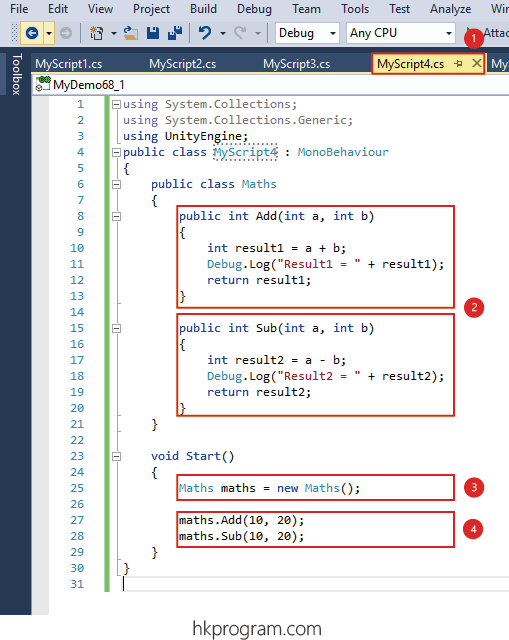
2.0) Simple Delegate
以下列出Class物件方法與Delegate Invoke方法的分別:
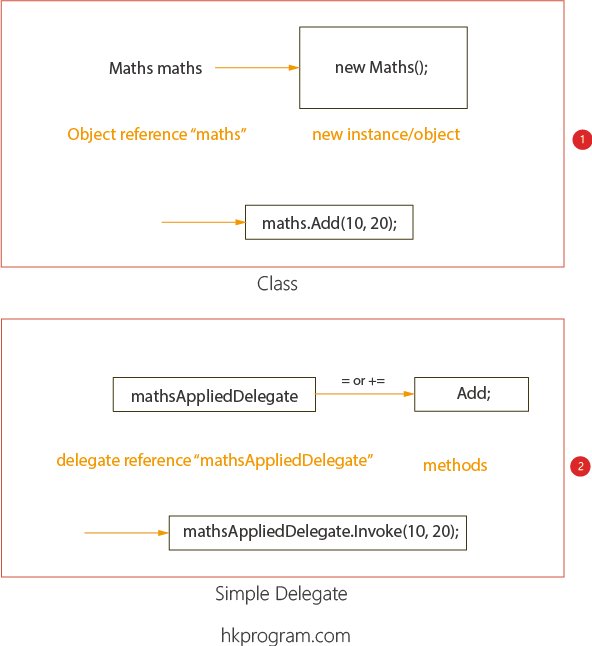
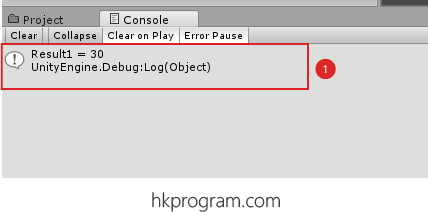
- Class物件方法 - maths.Add(10,20)。
- Delegate Invoke方法 - mathsAppliedDelegate.Invoke(10,20),大家可以發現,Invoke(10,20)已經代替了Add()方法,這就是第一個所謂的Encapsulation(封裝),我會再詳細介紹。
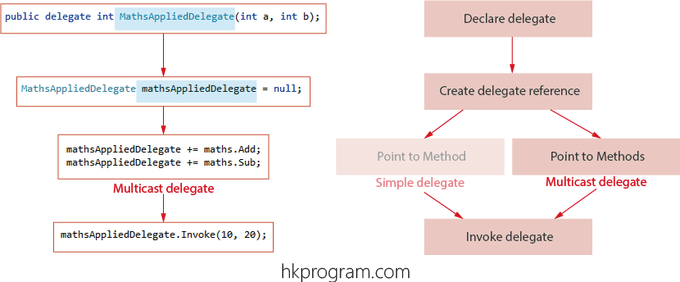
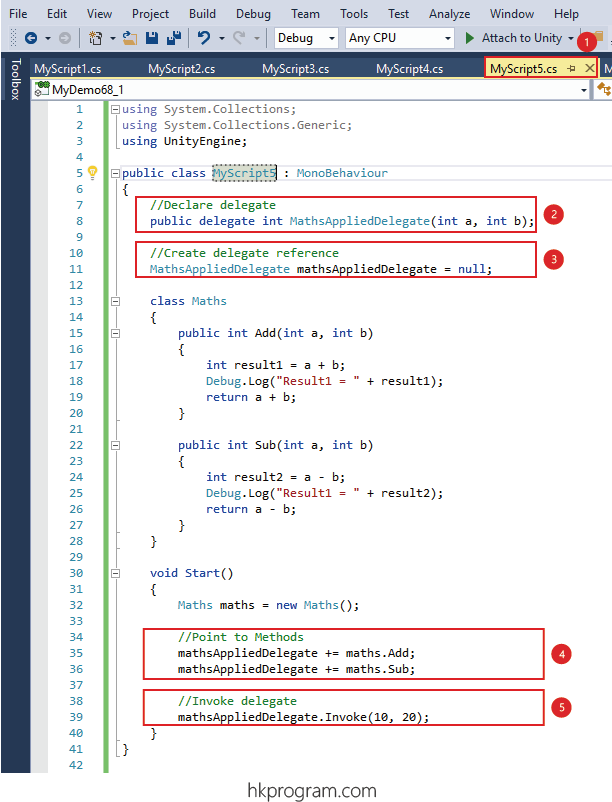
以下列出Delegate的四個主要部分:
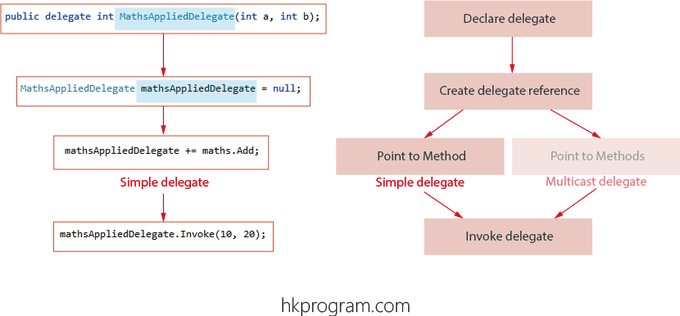
- Declare delegate - 宣告delegate。
- Create delegae reference - 建立delegae reference。
- Point to method - 指向方法。
- Invoke delegate - 調用/執行 delegate 指向的方法。
以下是一個簡單的Class物件方法例子:
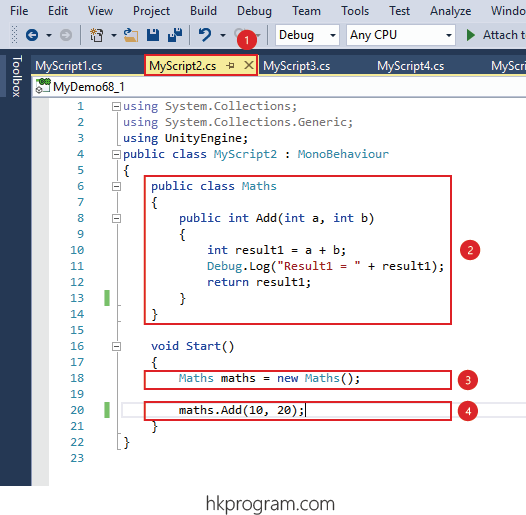
- 建立一個新的Script。
- 建立一個Maths類別和一個Add()方法。
- 建立Maths類別物件 - new Maths();。
- 執行類別物件方法 - maths.Add(10,20)方法。
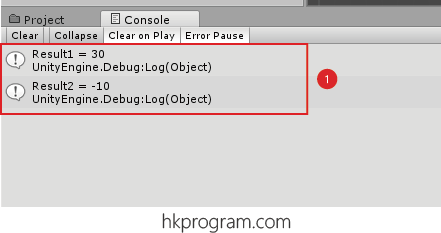
- 執行結果。
以下是一個簡單的delegate方法例子:
- 建立一個新的Script。
- Declare delegate - 宣告delegate。
- Create delegae reference - 建立delegae reference。
- Point to method - 指向方法。
- Invoke delegate - 調用/執行delegate指向的方法。
- 執行結果。
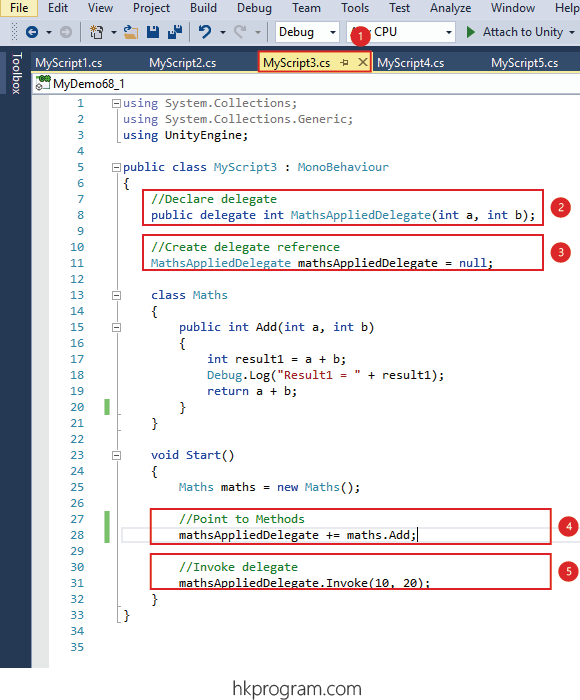
3.0) Multicast Delegates
以下是一個執行兩個Class物件方法與Delegate Invoke兩個方法的分別:
- Class物件方法 - maths.Add(10,20)和Sub.(10,20)。
- Delegate Invoke方法 - mathsAppliedDelegate.Invoke(10,20),大家可以發現,Invoke(10,20)已經代替了Add()和Sub()方法,這就是所謂的Encapsulation(封裝),我會再詳細介紹。
- Declare delegate - 宣告delegate。
- Create delegae reference - 建立delegae reference。
- Point to method - 指向方法。
- Invoke delegate - 調用/執行 delegate 指向的方法。
以下是一個執行兩個Class物件方法的例子:
- 建立一個新的Script。
- 建立一個Maths類別和一個Add()和Sub()方法。
- 建立Maths類別物件 - new Maths();。
- 執行類別物件方法 - maths.Add(10,20)和Sub(10,20)方法。
- 執行結果。
以下是一個執行兩個delegate方法例子:
- 建立一個新的Script。
- Declare delegate - 宣告delegate。
- Create delegate reference - 建立delegae reference。
- Point to method - 指向方法。
- Invoke delegate - 調用/執行delegate指向的方法。
- 執行結果。
4.0) Delegate & Event
以上介紹了運用delegate執行方法,它可以執行一個或多個方法,但大家可以發現,Invoke(10,20)已經代替了Add()和Sub()方法,這就是所謂的Encapsulation(封裝)。
但是,為甚麼我們須要用上event?
- 因為delegate只可封裝方法,delegate本身是暴露出來,即delegate本身不是封裝的。
- 而event除了封裝方法外,delegate也是封裝的。
我會詳細介紹。
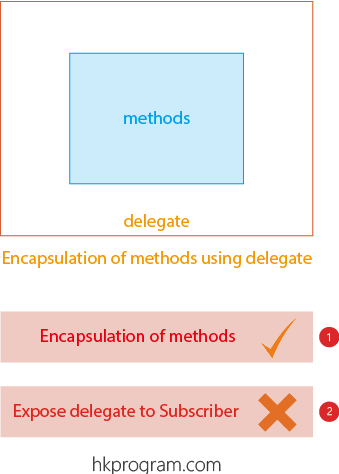
- delegate只可封裝方法。
- delegate本身是暴露出來,即delegate本身不是封裝的。
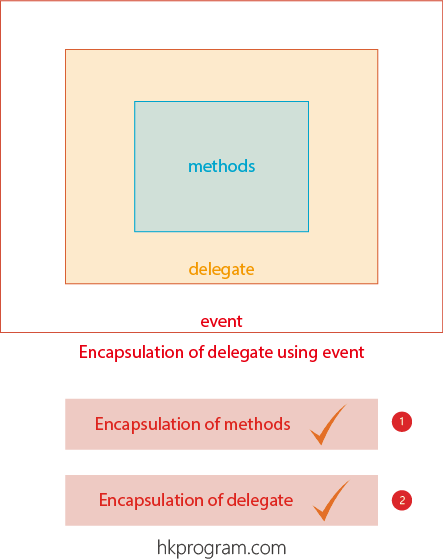
- event除了封裝方法外。
- delegate也是封裝的。
以下是一個delegate & event的方法:
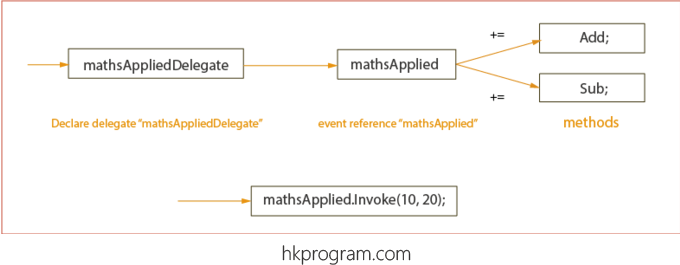
- Event Invoke方法 - mathsApplied.Invoke(10,20),大家可以發現,Invoke(10,20)已經代替了Add()和Sub()方法,這就是所謂的Encapsulation(封裝),我會再詳細介紹。
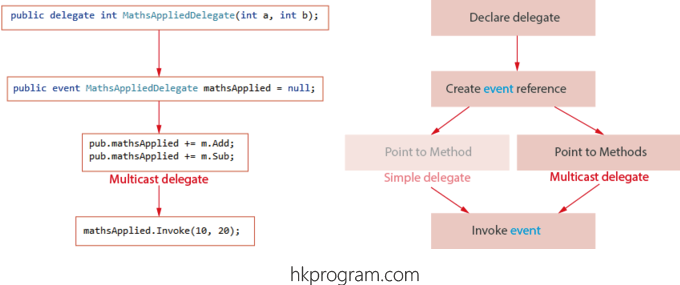
- Declare delegate - 宣告delegate。
- Create event reference - 建立event reference。
- Point to method - 指向方法。
- Invoke event - 調用/執行 event 指向的方法。
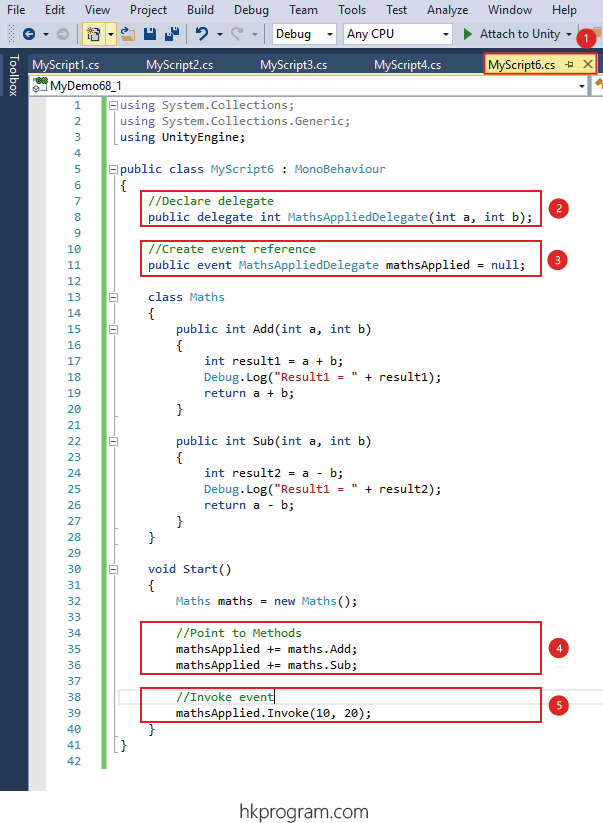
- 建立一個新的Script。
- Declare delegate - 宣告delegate。
- Create event reference - 建立event reference。
- Point to method - 指向方法。
- Invoke event - 調用/執行 event 指向的方法。
- 執行結果。
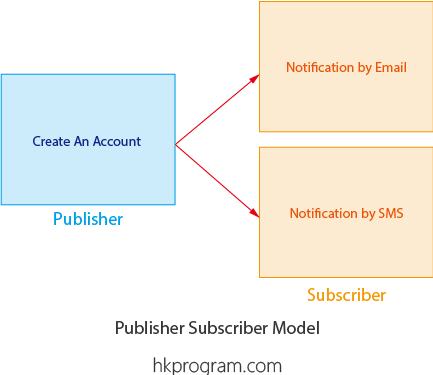
4.1) Publisher Subscriber Model
以下會介紹一個程式,它會用上delegate & event的,它就是Publisher Subscriber Model。
例如: 當大家建立一個Facebook Account或是建立一個Email Account,當成功申請後,大家就會收到Email或者SMS自動回覆。
4.2) Publisher Subscriber Model - Case 1 Delegate Only
以下例子會把剛剛介紹的程式重新規劃,把主要程式分為Publisher類別和Subscriber類別兩部分,這樣做,大家就會容易明白delegate & event用在Publisher Subscriber Model的原因和好處。

- 建立一個新的Script。
- 在Publisher類別內Declare delegate - 宣告delegate。
- 在Publisher類別內Create delegatereference - 建立 delegatereference。
- 在Subscriber類別內Point to method - 指向方法。
- 在Publisher類別內Invoke delegate - 調用/執行 delegate指向的方法。
- 在Start()方法內首先建立類別物件。
- 在Start()方法內執行Subscribe()方法和MathsApply()方法。
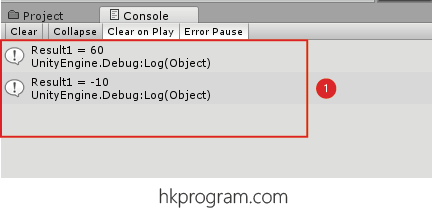
- 執行結果。
以下例子說明為甚麼delegate只可封裝方法,delegate本身是暴露出來,即delegate本身不是封裝的:
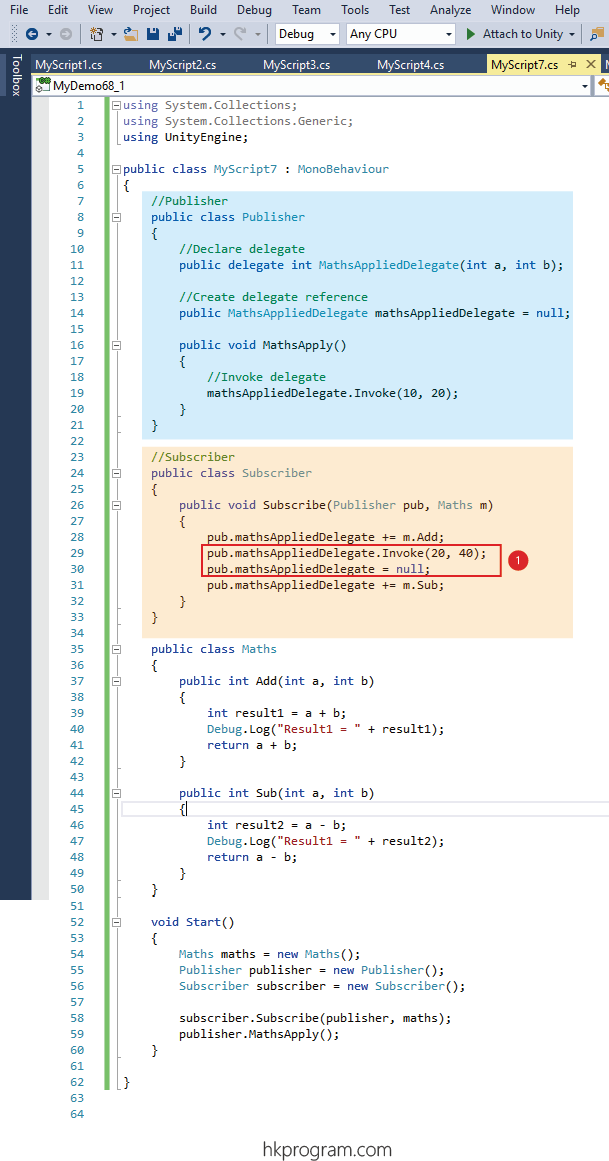
- 在以上例子可以看見,delegate除了可以用上+= (或-=)指向方法外,delegate還可以在Subscriber類別內更改delegate,即是任何人都可以執行Invoke delegate或刪除delegate指向的方法,這樣做就不會是一個好的程式,因為違反Encapsulation(封裝)的安全設計。
- 執行結果,注意: 因為大家可以任意執行Invoke delegate或刪除delegate指向的方法,這樣做就不會是一個好的程式,因為違反Encapsulation(封裝)的安全設計。
- delegate只可封裝方法。
- delegate本身是暴露出來,即delegate本身不是封裝的。
4.3) Publisher Subscriber Model - Case 2 Delegate & Event
以下例子會把剛剛介紹的程式重新規劃,把主要程式分為Publisher類別和Subscriber類別兩部分,這樣做,大家就會容易明白delegate & event用在Publisher Subscriber Model的原因和好處。

- 建立一個新的Script。
- 在Publisher類別內Declare delegate - 宣告delegate。
- 在Publisher類別內Create event reference - 建立event reference。
- 在Subscriber類別內Point to method - 指向方法。
- 在Publisher類別內Invoke event - 調用/執行event指向的方法。
- 在Start()方法內首先建立類別物件。
- 在Start()方法內執行Subscribe()方法和MathsApply()方法。
- 執行結果。
以下例子說明為甚麼event除了封裝方法外,delegate也是封裝的:
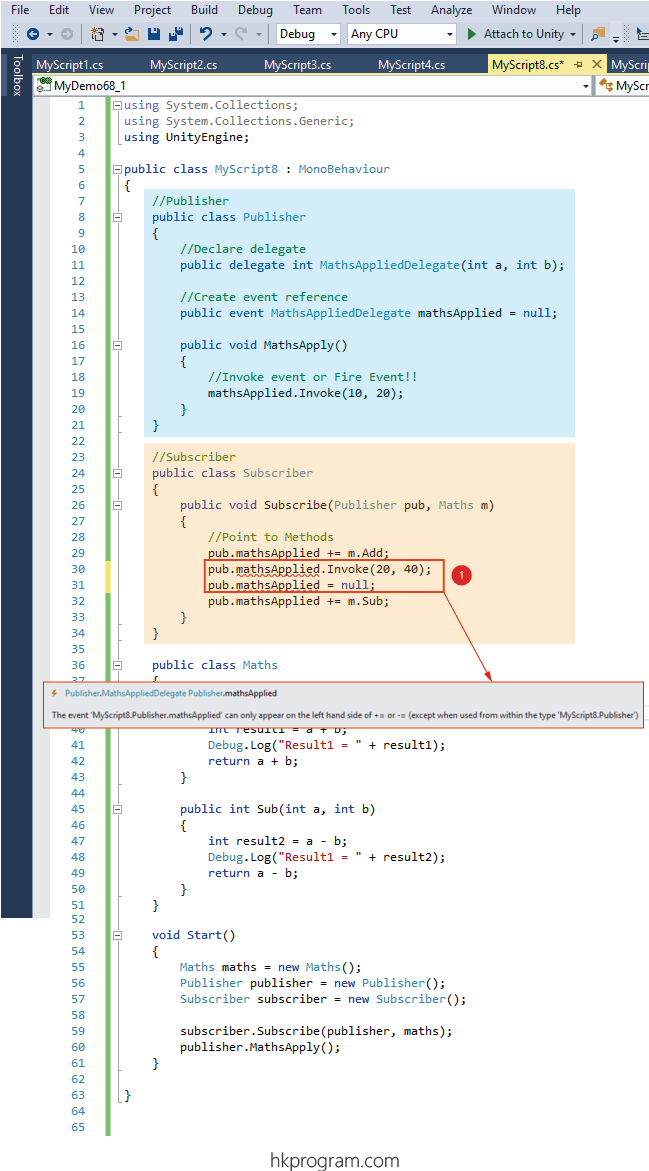
- 在以上例子可以看見,event只可以用上+= (或-=)指向方法外,大家不能在Subscriber類別內更改event,即是任何人只可以增加或減少指向的方法,而不可以執行Invoke event或刪除event指向的方法,這樣做就是一個好的程式,因為沒有違反Encapsulation(封裝)的安全設計。
- event除了封裝方法外。
- delegate也是封裝的。
4.4) Publisher Subscriber Model - Case 3 Create Account
以下例子會用一個日常生活的例子說明delegate & event用在Publisher Subscriber Model的原因和好處。
例如: 當大家建立一個Facebook Account或是建立一個Email Account,當成功申請後,大家就會收到Email或者SMS自動回覆。

- 建立一個新的Script。
- 在Publisher類別內Declare delegate - 宣告delegate。
- 在Publisher類別內Create event reference - 建立event reference。
- 在Start()方法內首先建立類別物件。
- 在Start()方法內執行Subscribe()方法,並在Subscriber類別內Point to method - 指向方法。
- 在Start()方法內執行AccountApply()方法。
- 在Publisher類別內執行OnAccountApplied()方法。
- 在Publisher類別內Invoke event - 調用/執行event指向的方法。
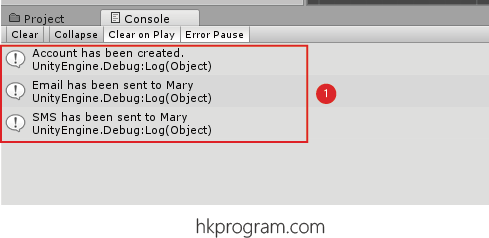
- 執行結果。
5.0) Polling VS Event Driven Input
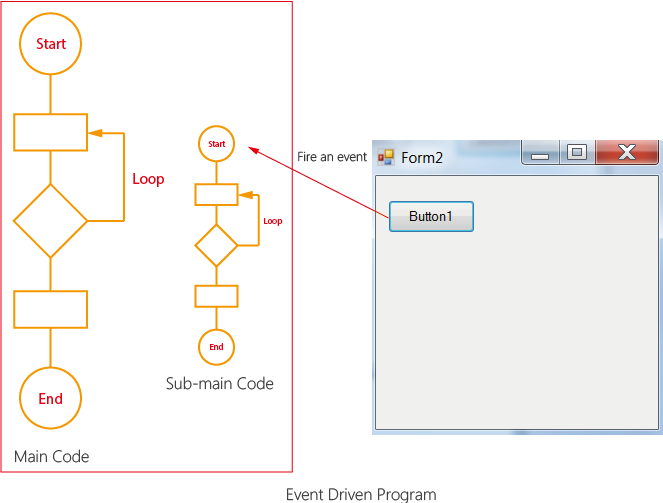
首先以下先介紹Sequential Program,它是一種最常見和簡單的程式結構,一行一行順序執行,當程式執行到等待電腦使用者輸入時,程式會進入等待狀態,直至電腦使用者輸入後,繼續下一行程式。
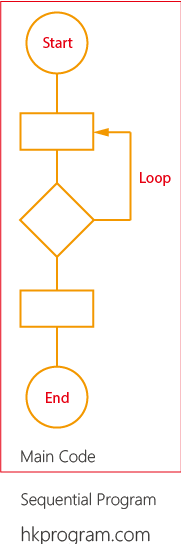
但當電腦程式到了可以與電腦使用者互動時,Sequential Program就不足夠,這時候就出現了Event Driven Program,即是我們可以在任何時間,按下按鈕,命令電腦執行有關的程式。
5.1) Polling VS Event Driven Input
我在第35節 - LibGDX: Input Control (Polling VS Event Driven Input)介紹過Polling Input與Event Driven Input的分別。
要在程式內用到Keyboard, Mouse & Touch Screen控制,主要有以下兩種方法:
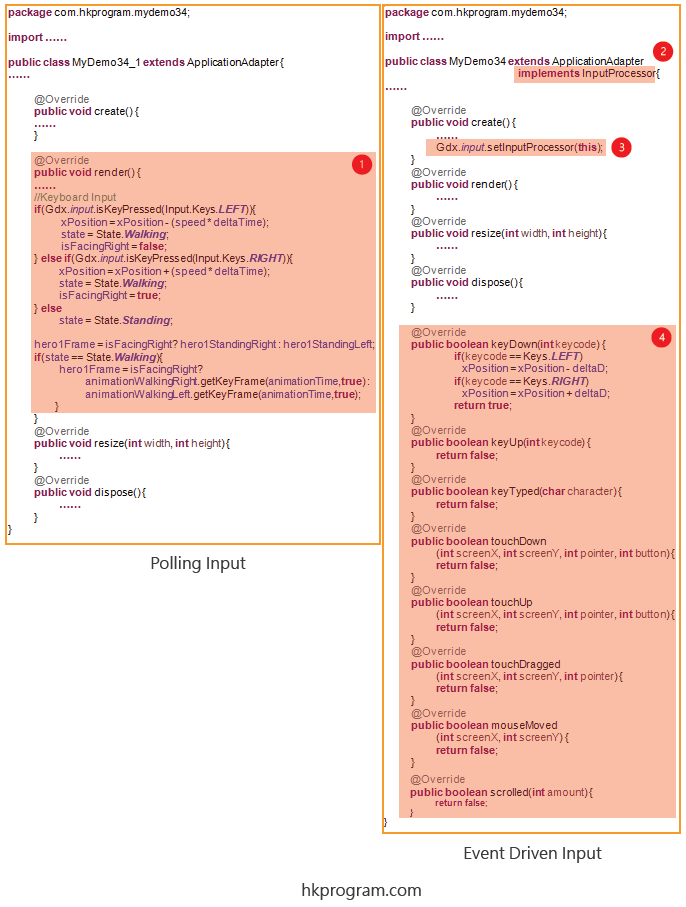
- 如果用Polling Input,偵測Keyboard, Mouse或Touch Screen動作就會在render()方法內完成。
- 如果用Event Driven Input,首先須要實作InputProcessor介面。
- 設定監聽動作Gdx.input.setInputProcessor(this);
- 在這例子裡,當Keyboard, Mouse或Touch Screen按下按鈕時,就會啟動以下方法:
keyDown()
keyUp()
keyTyped()
touchDown()
touchUp()
touchDragged()
mouseMoved()
scrolled()
注意,Keyword "this"相等於這個類別的物件。"this"=MyDemo34類別的物件=ApplicationAdapter類別物件=InputProcessor介面物件。因為MyDemo34類別繼承ApplicationAdapter,也實作了InputProcessor介面,所以"this"就可作MyDemo34或InputProcessor的物件用。
我也在第17節 - LibGDX: Splash Screen介紹過Keyword "this"。
以下是Polling Input和Event Driven Input的比較圖表:
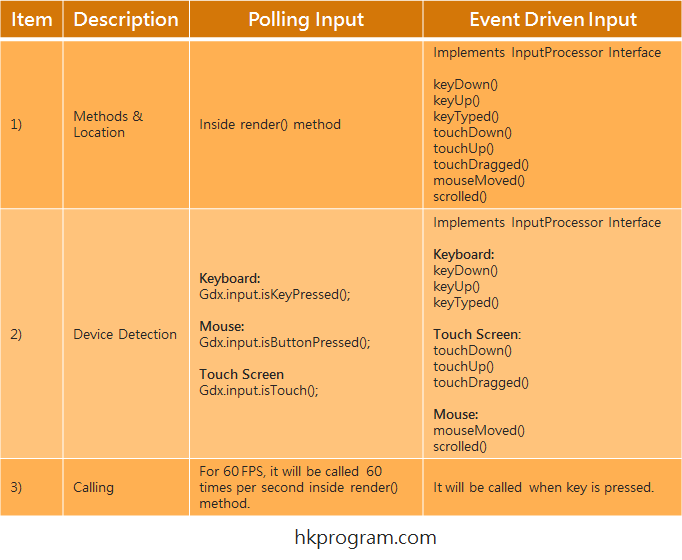
- 在Polling Input裡,偵測Keyboard, Mouse或Touch Screen動作就會在render()方法內完成。
在Event Driven Input裡,偵測Keyboard, Mouse或Touch Screen動作就會在新增方法內完成。 - 在Polling Input裡,我們須要用到Gdx.input.isKeyPressed(),Gdx.input.isButtonPressed()和Gdx.input.isTouched()。
在Event Driven Input裡,偵測Keyboard, Mouse或Touch Screen動作就會在新增方法內完成。 - 在Polling Input裡,因為偵測Keyboard, Mouse或Touch Screen動作會在render()方法內完成,所以在60 FPS環境下,Gdx.input.isKeyPressed(),Gdx.input.isKeyPressed()或Gdx.input.isKeyPressed()一秒會執行60次。
在Event Driven Input裡,只會偵測到Keyboard, Mouse或Touch Screen動作才會執行。
以下收錄一些英文的解釋:
Polling Input
It is more efficient to use Event Drive Input for keyboard, mouse and touch screen input, rather than Polling. If you are doing input control in game loop (i.e. within render() method), this is going to happen on every frame or interval (60FPS), and this is not efficient approach.
Event Driven Input
It is important to realize that a keyDown event will be fired for each individual key fired, so if you want to hadnle multiple simutanious key presses, this may not be the best way to approach the subject.
If you want to move an actor using the Input Processor, you will notice that it will move only when the keydown is pressed. To continuously handle input, or to move a sprite, you could add a "flag" to your actor.
注意,最後提及的"flag",就是在程式內偵測狀態,則Yes/No,true/false等等。
我們所用的enum type,則State.Standing和State.Walking,就是用來做程式的"flag"。
5.2) Sequential Program Example
以下會介紹一個簡單的Sequential Program:
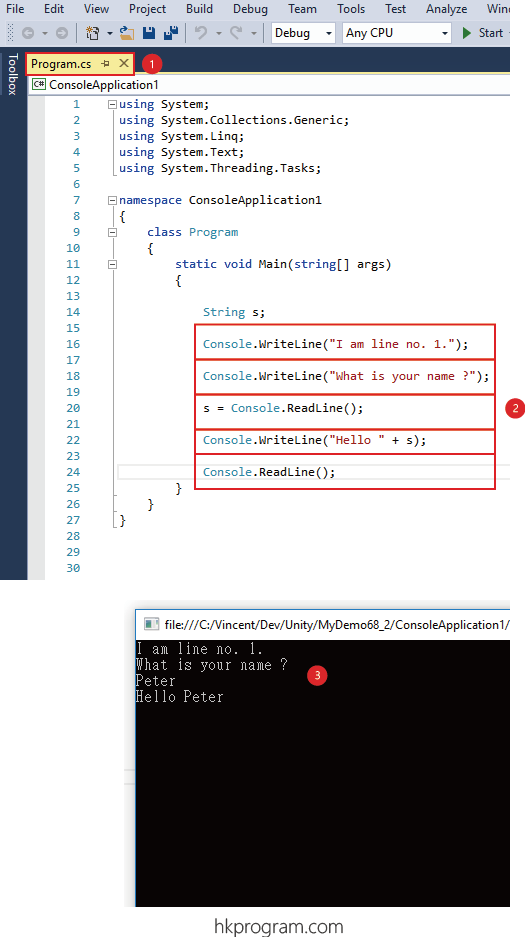
- 建立一個新的Script。
- 建立一行一行的執行程式。
- 執行結果。
一行一行順序執行,當程式執行到等待電腦使用者輸入時,程式會進入等待狀態,直至電腦使用者輸入後,繼續下一行程式。
5.3) Event Driven Program Example
以下會介紹一個簡單的Event Driven Program (Button OnClick方法):
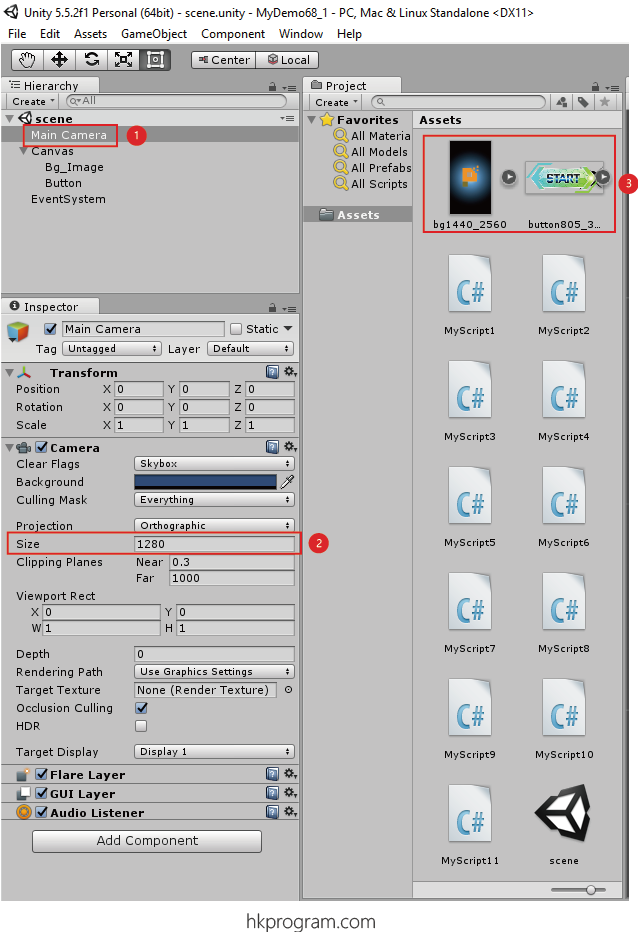
- 建立一個新Project 。
- 選擇Main Camera,設定Orthographic Size = 250/2 = 1280。
- 把所有須要的圖片在你的電腦內拖放到Assets區域內。

- 建立一個Canvas。
- 設定Canvas的不同值。
- 選擇Main Camera,把Main Camera拖放到Render Camera內。
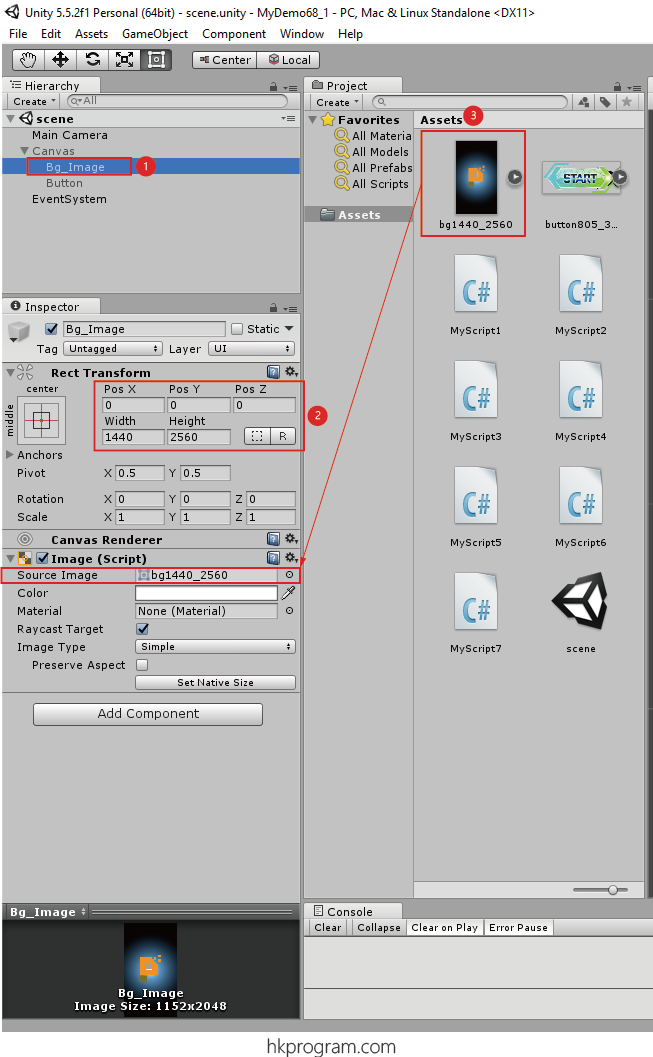
- 在於Canvas內建立一個Bg_Image。
- 設定W x H = 1440 x 2560。
- 把圖片拖放到Image (Script)內。
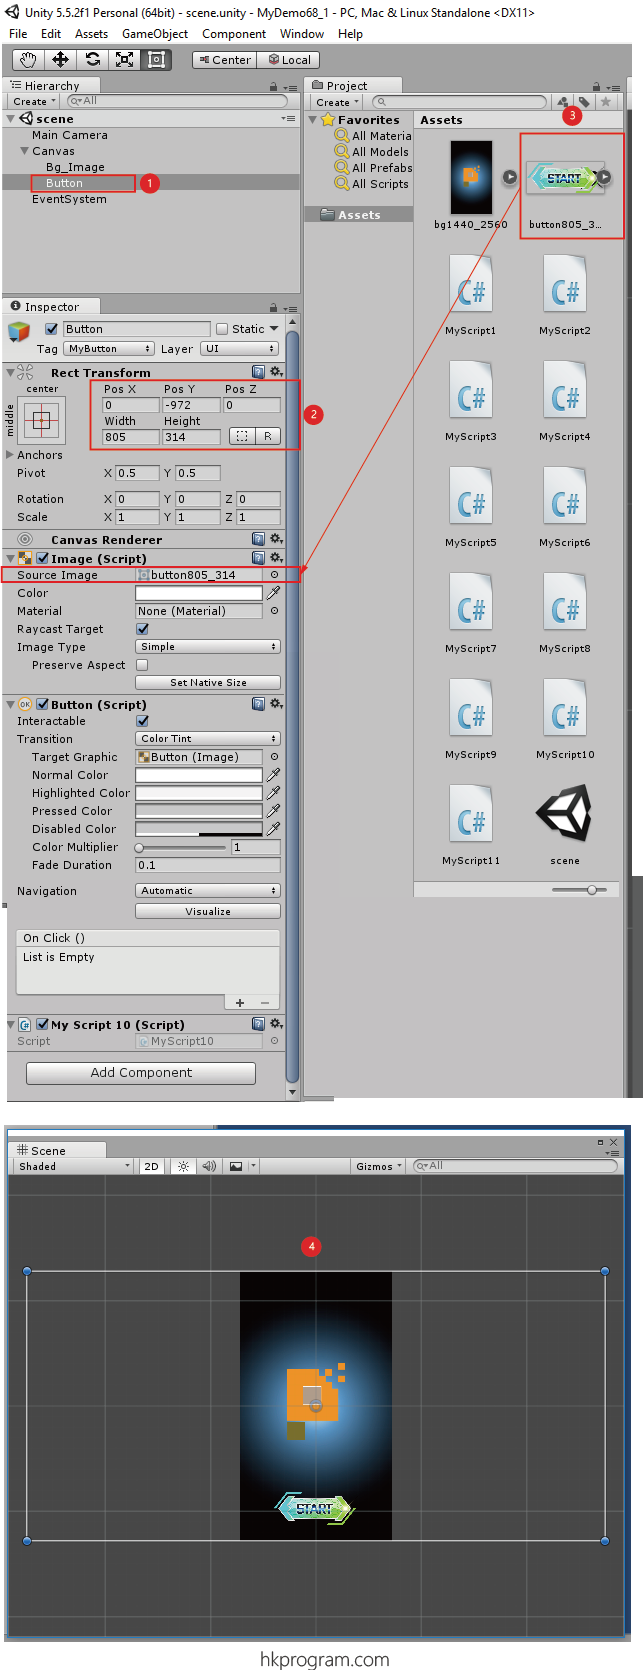
- 在Canvas內建立一個Button。
- 設定位置和W x H = 805 x 314。
- 把StartButton圖片拖放到Image (Script)內。
- Scene畫面如上圖。
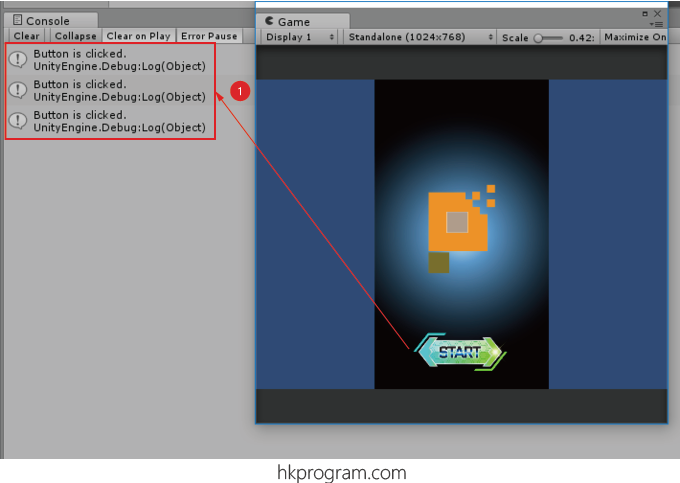
- 按一下按鈕,執行按鈕預設程式。
6.0) Conclusion
以下作一小總結:
- 其實delegate不是必須的,它的功能可以用其他程式代替,但是有了delegate就可以改善程式的結構和方便程式將來的擴充。
- delegate的出現,其中一個主要原因,就是配合event,把Sequential程式結構,改變為主Event Driven程式結構,最常用的例子就是程式預設的Button按鈕的Click事件(Event)。
- 除了Delegate & Event預設的程式外(例如: Button按鈕的Click事件),當我們想在執行程式時觸發一件事件,例如我們以上介紹的Publisher Subcriber Model,我們就可以用上Delegate & Event。