


第34節 - LibGDX: Keyboard, Mouse & Touch Screen Control (Polling Input)
這一節我會介紹LibGDX的Keyboard, Mouse & Touch Screen Control。
我在第33節 - LibGDX: Animation & Spritesheet介紹過圖片(hero1.png)向右移動的動畫效果,這一節會介紹用Keyboard、Mouse和Touch Screen控制。
要在程式內用Keyboard, Mouse 和 Touch Screen Control控制圖片移動,主要有以下兩種方法:
- 方式1 - Polling Input。
- 方式2 - Event Driven Input。
注意,這一節會介紹Polling Input的用法,以下會簡單介紹Polling Input和Event Driven Input的分別,至於Polling Input和Event Driven Input的詳細介紹,我會在第35節 - LibGDX: Input Control (Polling VS Event Driven Input)介紹。
Polling Input VS Event Driven Input
以下是Polling Input和Event Driven Input的比較:
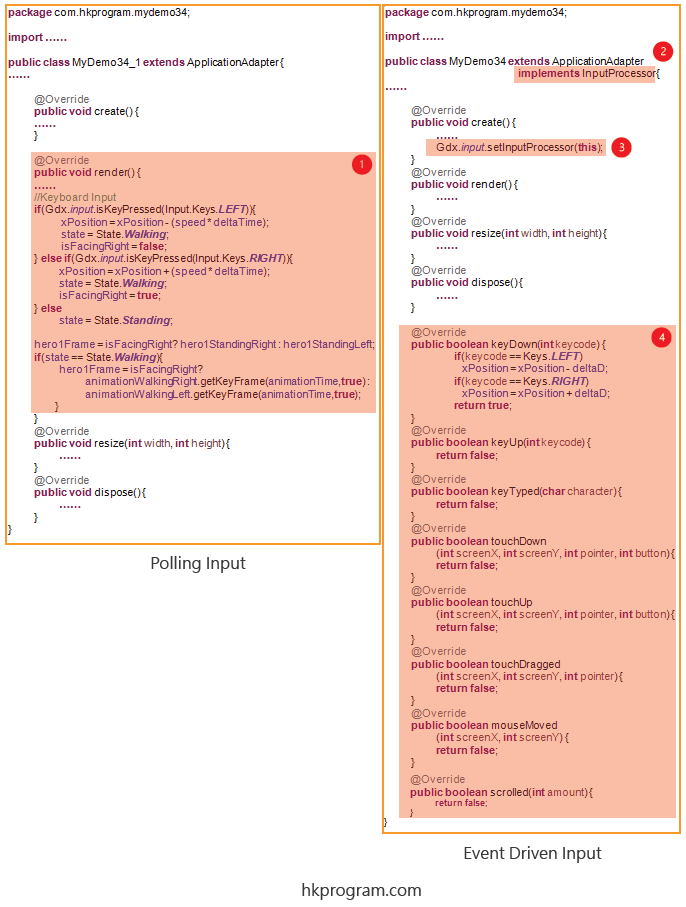
- 如果用Polling Input,偵測Keyboard, Mouse或Touch Screen動作就會在render()方法內完成。
- 如果用Event Driven Input,首先須要實作InputProcessor介面。
- 設定監聽動作Gdx.input.setInputProcessor(this);
- 在這例子裡,當Keyboard, Mouse或Touch Screen按下按鈕時,就會啟動以下方法:
keyDown()
keyUp()
keyTyped()
touchDown()
touchUp()
touchDragged()
mouseMoved()
scrolled()
注意,Keyword "this"相等於這個類別的物件。"this"=MyDemo34類別的物件=ApplicationAdapter類別物件=InputProcessor介面物件。因為MyDemo34類別繼承ApplicationAdapter,也實作了InputProcessor介面,所以"this"就可作MyDemo34或InputProcessor的物件用。
我也在第17節 - LibGDX: Splash Screen介紹過Keyword "this"。
以下是Polling Input和Event Driven Input的比較圖表:
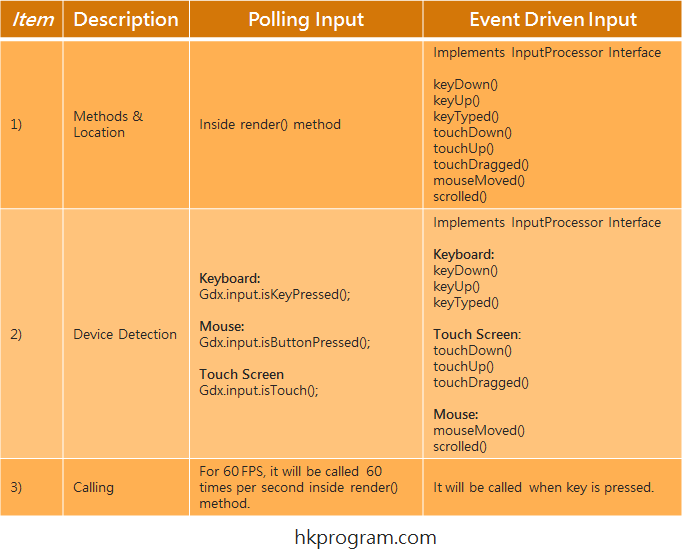
- 在Polling Input裡,偵測Keyboard, Mouse或Touch Screen動作就會在render()方法內完成。
在Event Driven Input裡,偵測Keyboard, Mouse或Touch Screen動作就會在新增方法內完成。 - 在Polling Input裡,我們須要用到Gdx.input.isKeyPressed(),Gdx.input.isButtonPressed()和Gdx.input.isTouched()。
在Event Driven Input裡,偵測Keyboard, Mouse或Touch Screen動作就會在新增方法內完成。 - 在Polling Input裡,因為偵測Keyboard, Mouse或Touch Screen動作會在render()方法內完成,所以在60 FPS環境下,Gdx.input.isKeyPressed(),Gdx.input.isKeyPressed()或Gdx.input.isKeyPressed()一秒會執行60次。
在Event Driven Input裡,只會偵測到Keyboard, Mouse或Touch Screen動作才會執行。
製作Spritesheet
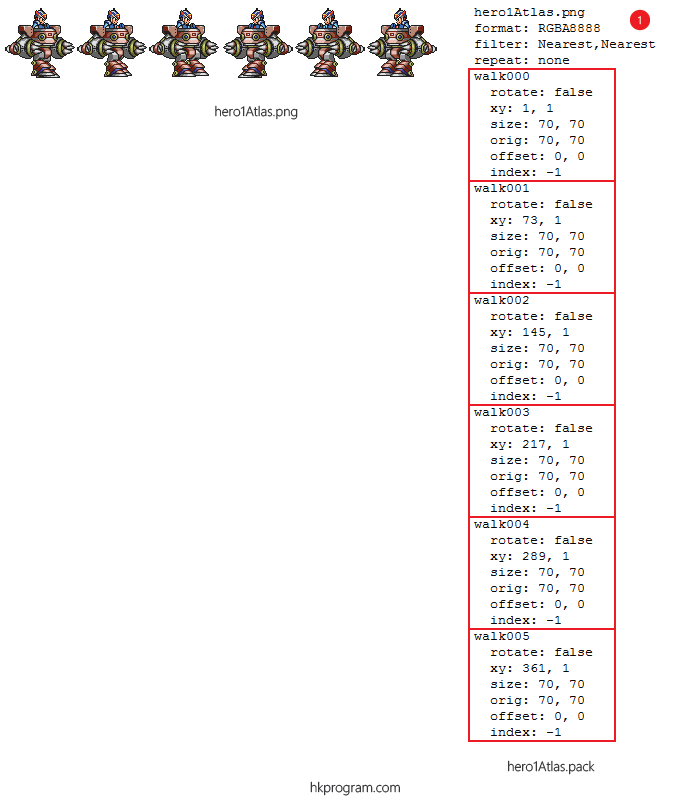
- 我在第18節 - LibGDX: Texture Packer介紹過如何用Texture Packer軟件把不同的圖片(.png)合併成一張sprite sheet。以上用了六張簡單圖片做出Standing Left, Standing Right, Walking Left 和Walking Right動作。
製作動畫 - TextureRegion & Animation Class
- 把Spritesheet(hero1Atlas.pack)傳入TextureAtlas物件(hero1Atlas)內。
- 建立Standing Left, Standing Right, Animation Left和Animation Right動作。
- 建立Keyboard, Mouse或Touch Screen的程式碼:
Keyboard: Gdx.input.isKeyPressed()
Mouse: Gdx.input.isButtonPressed()
Touch Screen: Gdx.input.isTouched() - 把hero1Frame最新的格數傳入sprite內。
- 把sprite顯示在屏幕上。
Main Part
以下會詳細介紹主要的部分:
1) enum 型態
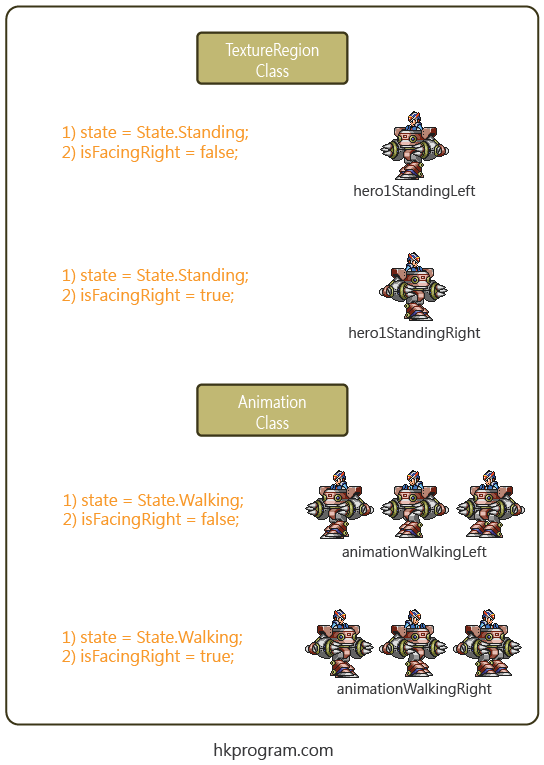
enum全名是Enumeration,Enum 型態是一組固定的常數 (constant) ,在以下例子裡,我們可以建立一個State(enum 型態),並設定Standing和Walking,這樣做我們就產生了:
State.Standing
State.Walking
它們就可用來判斷動畫的最新狀態。
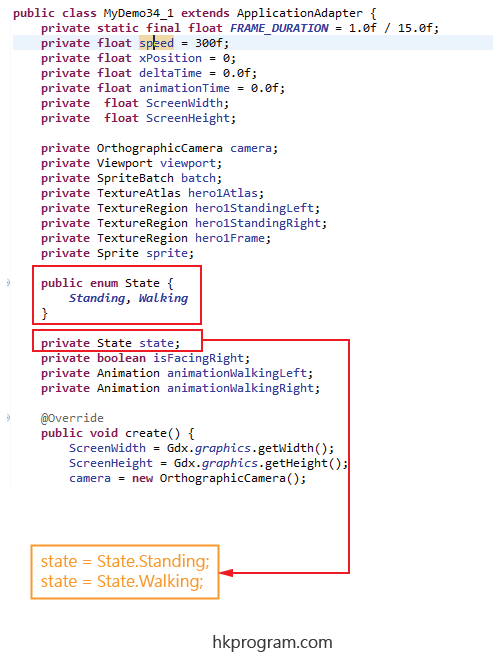
以下是動畫的四種可能性:
Standing Left
Standing Right
Walking Left
Walking Right
2) Input Control
以下是Keyboard程式碼:
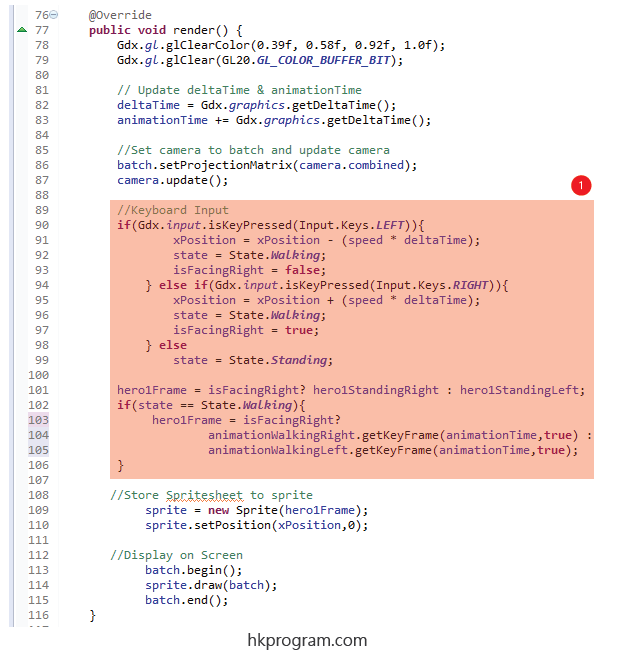
- 用Gdx.input.isKeyPressed()方法判斷向左或向右,最後把最新的狀態傳入hero1Frame內。
以下是Mouse程式碼:
- 用Gdx.input.isButtonPressed()方法判斷向左或向右,最後把最新的狀態傳入hero1Frame內。
以下是Touch Screen程式碼:
- 用Gdx.input.isTouched()方法判斷向左或向右,最後把最新的狀態傳入hero1Frame內。
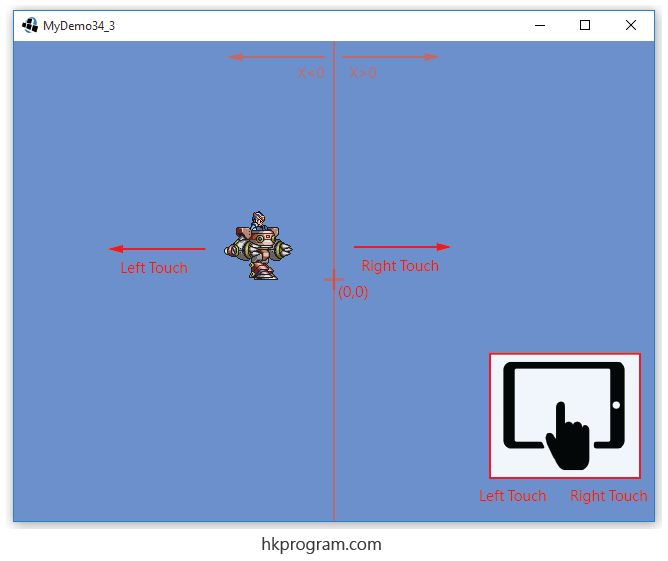
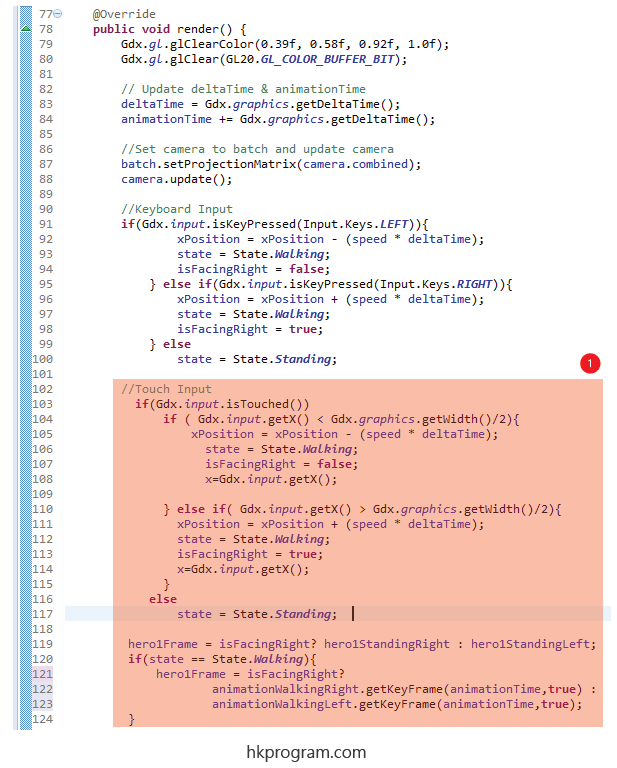
注意,我把屏幕分為左右兩部分,如果X座標<0,相等於左面; 如果X座標>0,相等於右面。
例子1 - Keyboard Input (Polling Input)
這個例子會詳細介紹用Keyboard控制動畫左右移動:
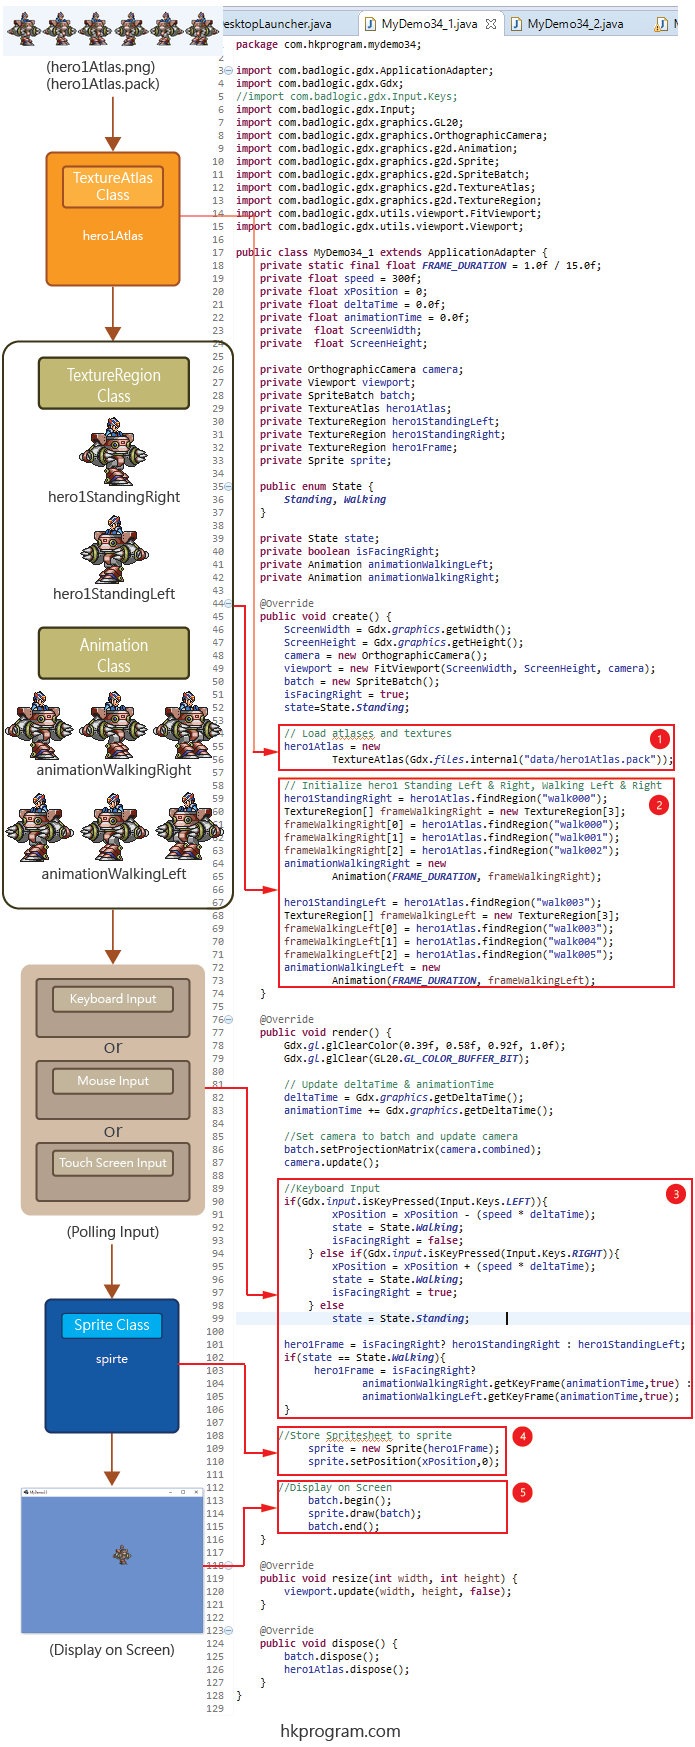
DesktopLauncher.java
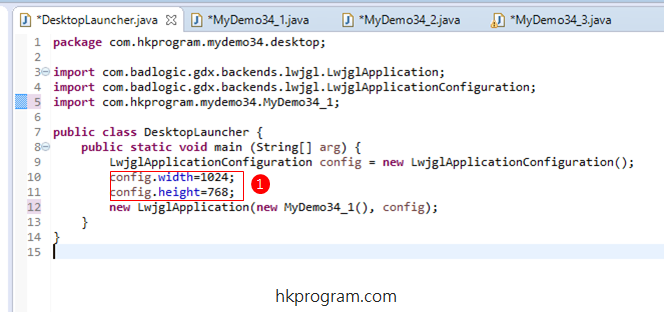
- DesktopLauncher是PC Desktop的Starter Class,我們在DesktopLauncher內設定顯示的大小為1024 X 768 px。
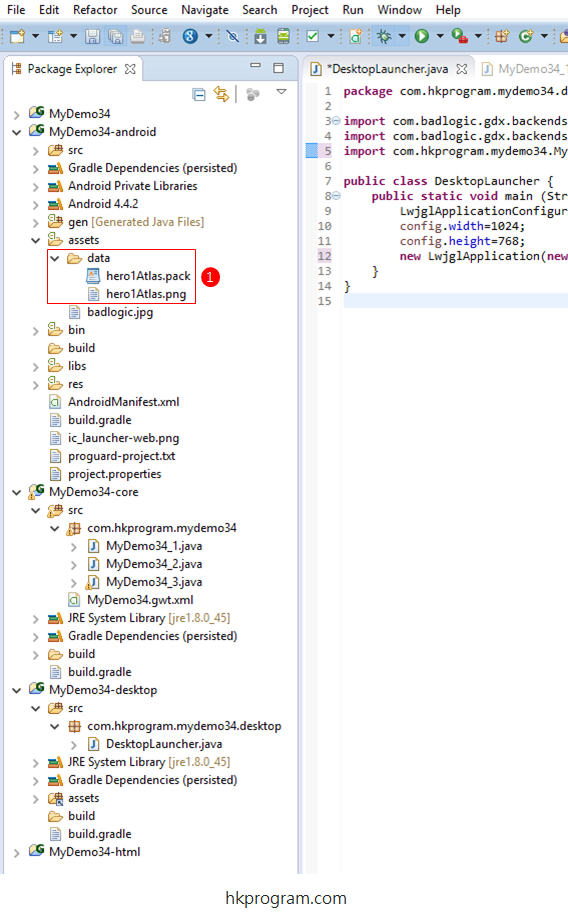
- 把hero1Atlas.pack和hero1Atlas.png儲存到Android的Assets文件夾內。
MyDemo34_1.java
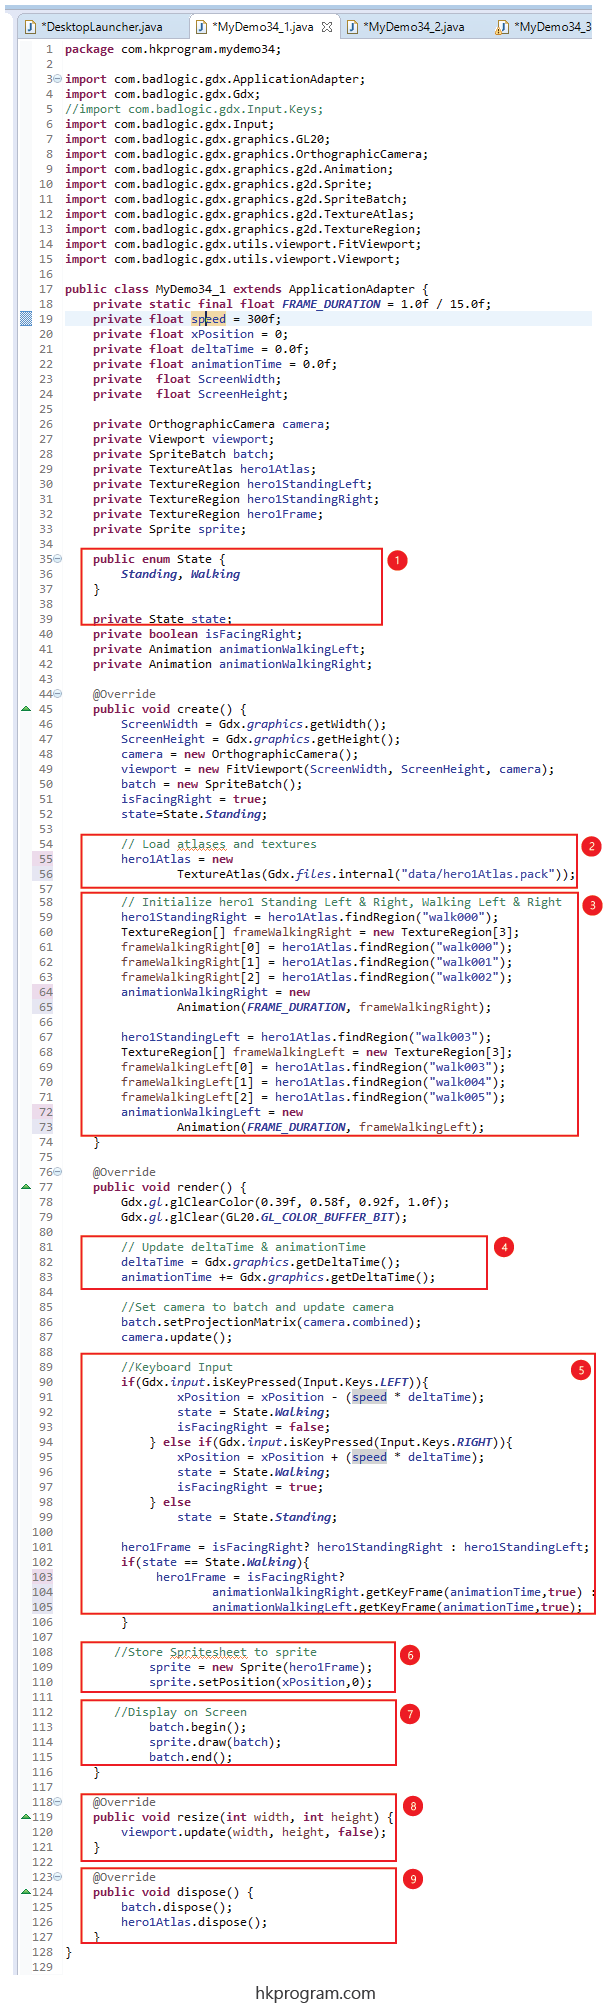
- 建立State (enum type)。
- 把Spritesheet(hero1Atlas.pack)傳入TextureAtlas物件(hero1Atlas)內。
- 建立Standing Left, Standing Right, Animation Left和Animation Right動作。
- 用LibGDX的Gdx.graphics.getDeltaTime(),它可以敢得兩格(two frames)動畫之間的時間,用來控制動畫的速度。+=是用來聚積animationTime時間值。
用animation.getKeyFrame()方法把animationTime變數傳入,這個方法可以自動計算animationTime的聚積時間值,並自動顯示正確的格數。 - 建立Keyboard的程式碼:
Keyboard: Gdx.input.isKeyPressed() - 把hero1Frame最新的格數傳入sprite內,並設定sprite的最新位置。
- 把sprite顯示在屏幕上。
- 因為我們有用到Viewport類別,當屏幕呎寸改變時,就須要更新Viewport。
- 最後呼叫dispose()方法,執行batch.dispose();和hero1Atlas.dispose();,釋放資源。
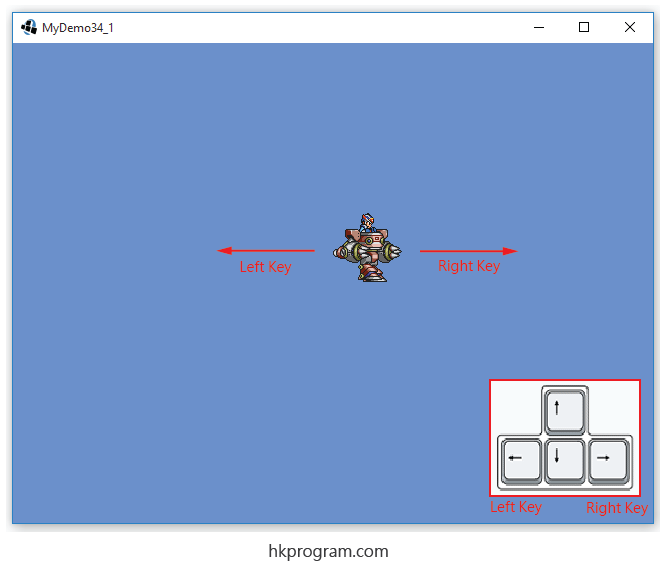
執行程式:
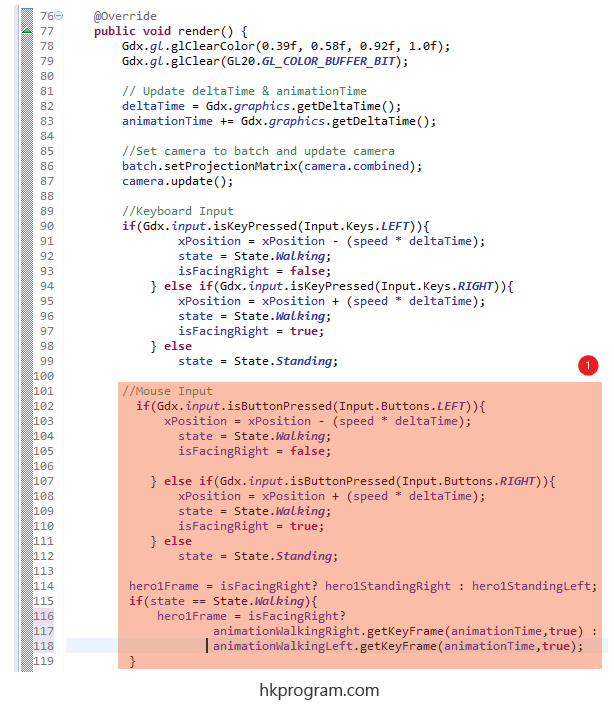
例子2 - Mouse Input (Polling Input)
這個例子會詳細介紹用Mouse控制動畫左右移動:
MyDemo34_2.java
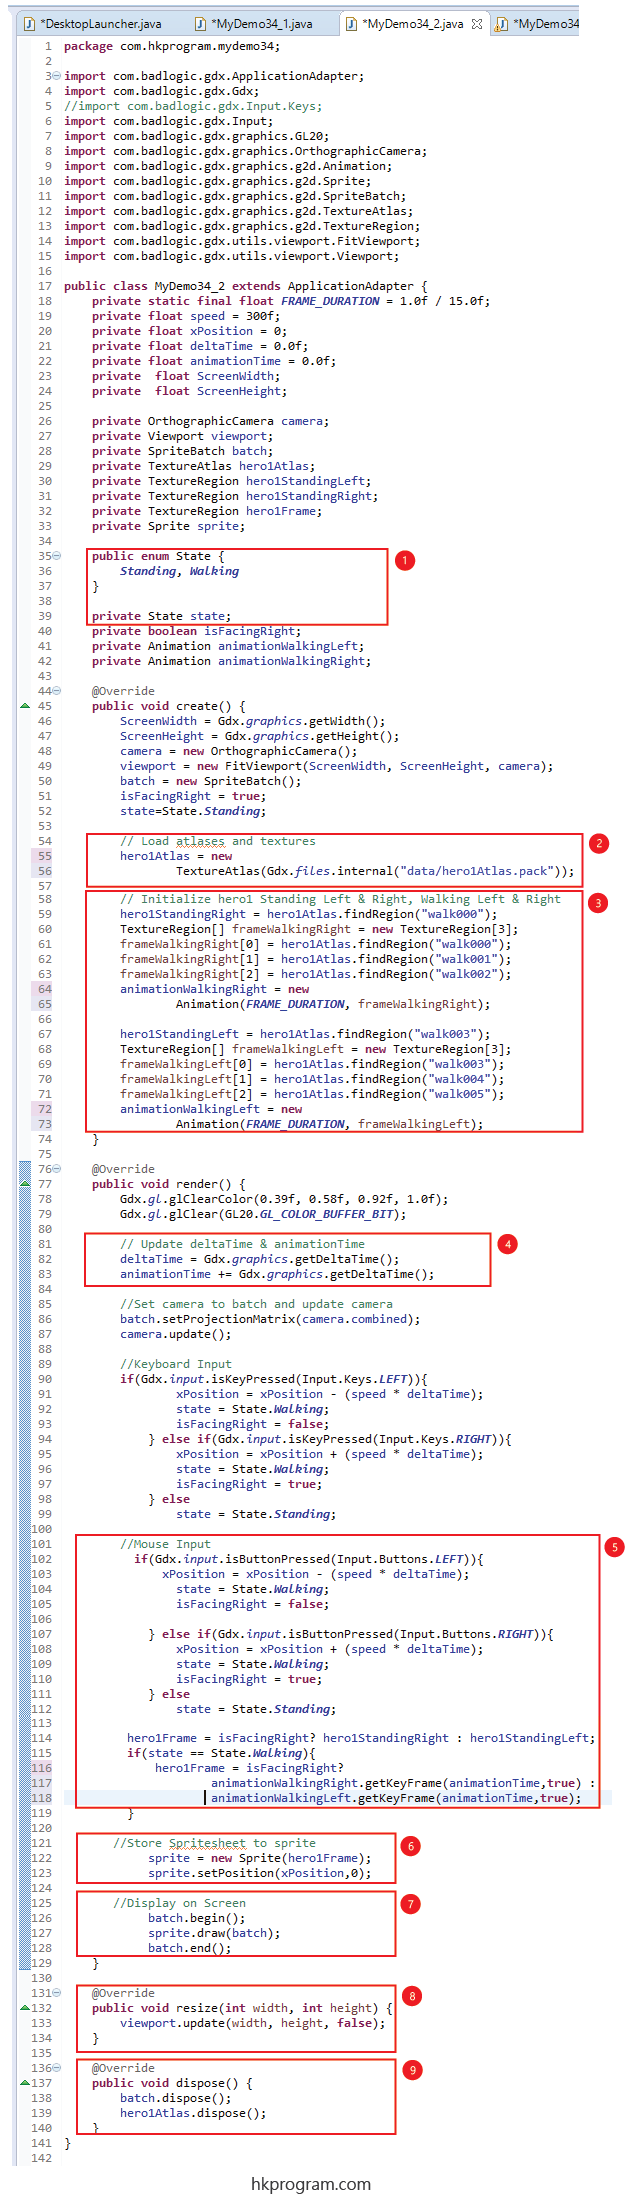
- 建立State (enum type)。
- 把Spritesheet(hero1Atlas.pack)傳入TextureAtlas物件(hero1Atlas)內。
- 建立Standing Left, Standing Right, Animation Left和Animation Right動作。
- 用LibGDX的Gdx.graphics.getDeltaTime(),它可以敢得兩格(two frames)動畫之間的時間,用來控制動畫的速度。+=是用來聚積animationTime時間值。
用animation.getKeyFrame()方法把animationTime變數傳入,這個方法可以自動計算animationTime的聚積時間值,並自動顯示正確的格數。 - 建立Mouse的程式碼:
Mouse: Gdx.input.isButtonPressed() - 把hero1Frame最新的格數傳入sprite內,並設定sprite的最新位置。
- 把sprite顯示在屏幕上。
- 因為我們有用到Viewport類別,當屏幕呎寸改變時,就須要更新Viewport。
- 最後呼叫dispose()方法,執行batch.dispose();和hero1Atlas.dispose();,釋放資源。
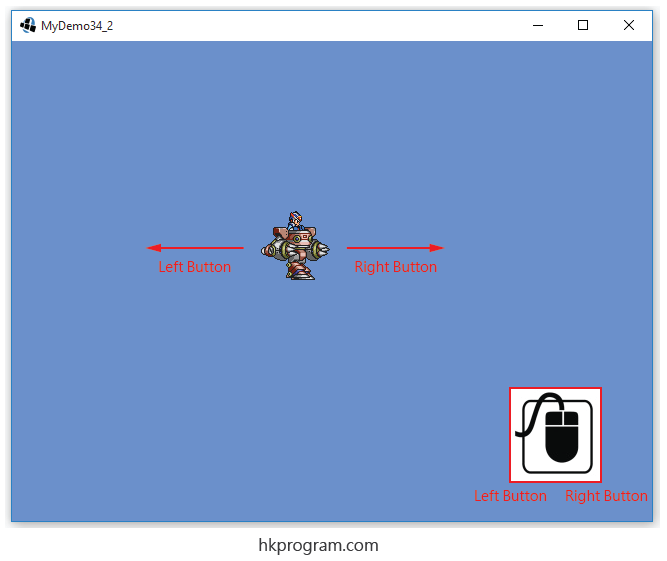
執行程式:
例子3 - Touch Screen Input (Polling Input)
這個例子會詳細介紹用Touch Screen控制動畫左右移動:
MyDemo34_3.java
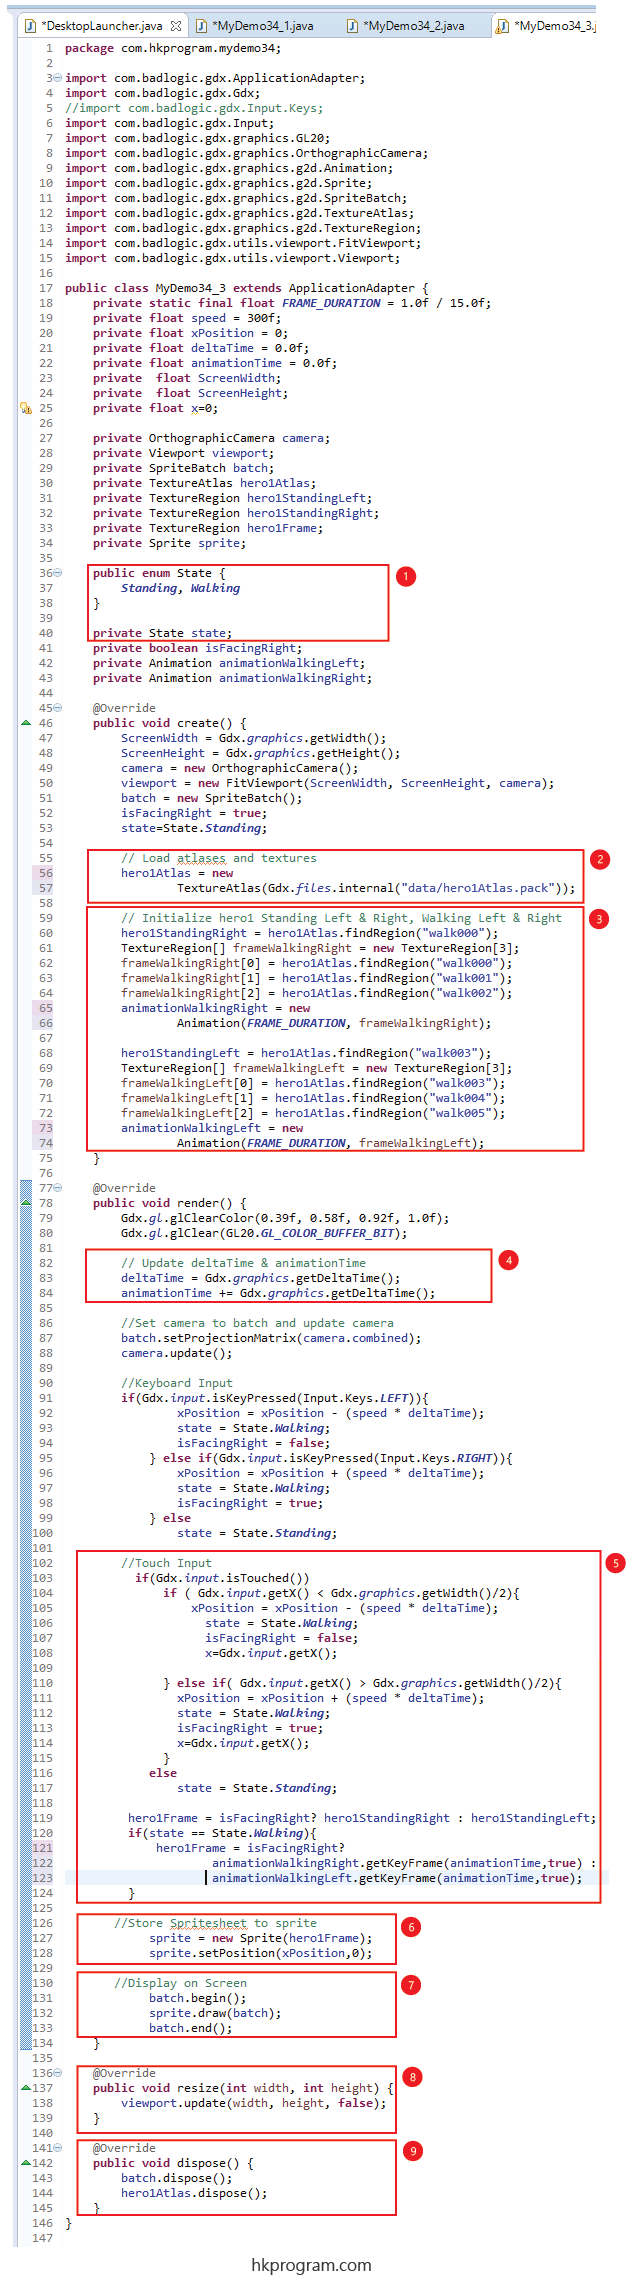
- 建立State (enum type)。
- 把Spritesheet(hero1Atlas.pack)傳入TextureAtlas物件(hero1Atlas)內。
- 建立Standing Left, Standing Right, Animation Left和Animation Right動作。
- 用LibGDX的Gdx.graphics.getDeltaTime(),它可以敢得兩格(two frames)動畫之間的時間,用來控制動畫的速度。+=是用來聚積animationTime時間值。
用animation.getKeyFrame()方法把animationTime變數傳入,這個方法可以自動計算animationTime的聚積時間值,並自動顯示正確的格數。 - 建立Touch Screen的程式碼:
Touch Screen: Gdx.input.isTouched() - 把hero1Frame最新的格數傳入sprite內,並設定sprite的最新位置。
- 把sprite顯示在屏幕上。
- 因為我們有用到Viewport類別,當屏幕呎寸改變時,就須要更新Viewport。
- 最後呼叫dispose()方法,執行batch.dispose();和hero1Atlas.dispose();,釋放資源。
執行程式: