


第11節 - LibGDX: World, Texture, Background, Camera, Viewport, Screen & OpenGL
這一節會介紹LibGDX顯示圖像的不同方法,當中要明白以下概念:
- World Coordinate System
- Texture,包括幕前圖像(Objects-人物和物件)和背景圖像(Background Color和Background Image)
- Camera和Camera Viewport
- Screen
- OpenGL
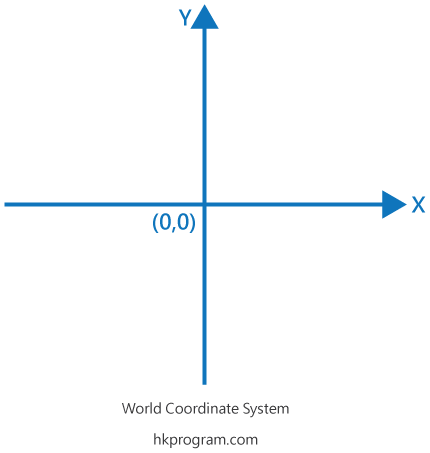
座標系統(Coordinate System)簡介
首先介紹兩種主要座標系統(右X,上Y)和(右X,下Y)。
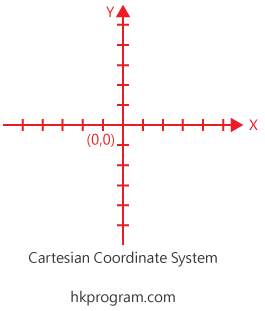
1 - 座標系統(右X,上Y)
座標系統(右X,上Y)就是我們數學學的Cartesian Coordinate System。
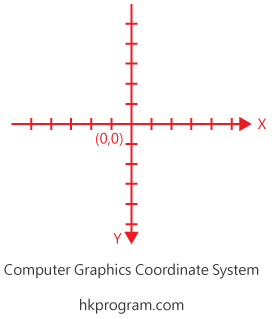
2 - 座標系統(右X,下Y)
座標系統(右X,下Y)就是電腦圖像所用的座標系統(Computer Graphics Coordinate System或Pixel Coordinate System)。
3 - 為甚麼電腦圖像座標系統是用(右X,下Y)?
這是因為電腦屏幕初期,用的是CRT(Cathode Ray Tubes )顯像管,屏幕會由左至右,上至下掃描,再回到起點完成一個週期。這一個週期就叫做Framerate(Frame per second,Hz)。
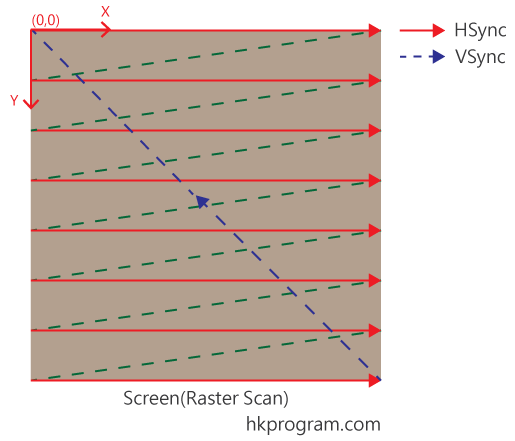
而電腦屏幕上每一點是一個Raster(Pixel)格仔,每一個格仔記錄了一個座標,而電腦圖像會用Video Memory(VRAM)處理每一個格仔的顏色,這裡不會詳細介紹。
以下收錄一些英文解釋,這裡不會詳細介紹:
Why is the origin in computer graphics coordinates at the top left?
To ease the interface between the graphics card memory and the CRT the memory was read from the beginning and the image was drawn from the top left (with the lowest memory address) to the lower right (with the highest memory address).
The CRTs are based on analog TV sets that were available at that time.
The TV sets create the image line by line first from left to right and then from top to bottom. The reason for this can only be assumed to be based on the writing style in western countries.
LibGDX座標系統
1 - World Coordinate System (LibGDX Coordinate System)
首先,LibGDX主要是用World Coordinate為中心,所有圖片或物件都是用World Coordinate設定位置,而World Coordinate用的座標系統是(右X,上Y),這種座標系統就是我們數學學的Cartesian Coordinate System。
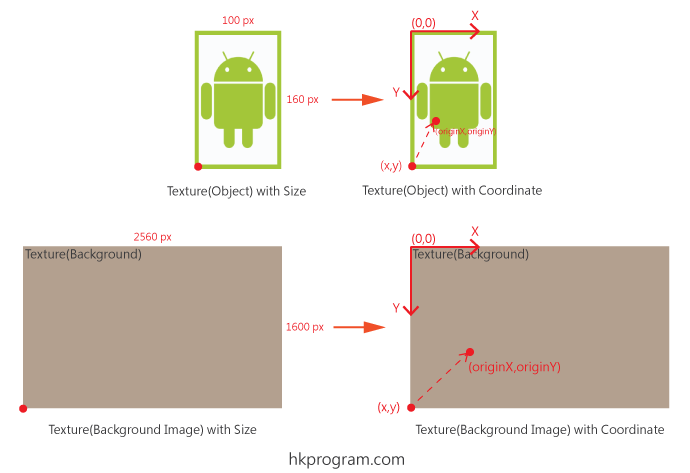
2 - Texture
Texture,包括幕前圖像(Objects-人物和物件)和背景圖像(Background Color和Background Image)
簡單來說,幕前圖像可以叫做Objects,例如人物和物件,而背景圖像可以只有顏色(Background Color)或是一張圖片(Background Image)。
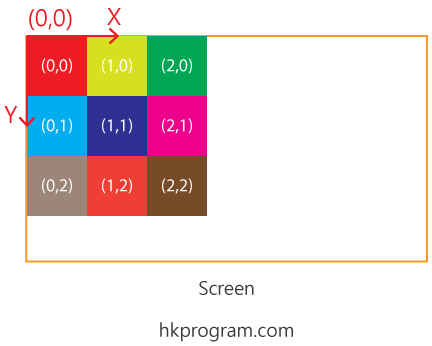
而LibGDX內的Texture Class用來儲存圖像,例如.png檔案,Texture用的座標系統是(右X,下Y),這種座標系統就是以上介紹的座標系統(Computer Graphics Coordinate System或Pixel Coordinate System)。
所以所有幕前Objects圖像(例如:人物和物件),背景圖像(例如:Background Image),用的座標系統都是(右X,下Y)。
注意,下圖每一幅圖片的左下角都有一粒紅色小圓點,LibGDX就是用batch.draw() method把圖片的左下角移到World Coordinate的(x,y)位置,我會在下面部分加以解釋。
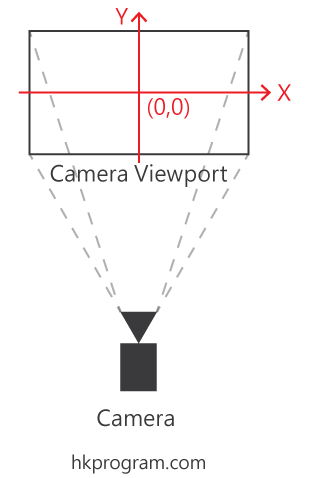
3 - Camera和Camera Viewport
首先LibGDX內有一個Camera Class,用的座標系統是(右X,上Y),而中心(0,0)是設在中間的,這種座標系統就是我們數學學的Cartesian Coordinate System。
而LibGDX的Viewport只是Camera看到的區域,所以Camera Viewport就是Camera的一部分,我們會詳細解釋。
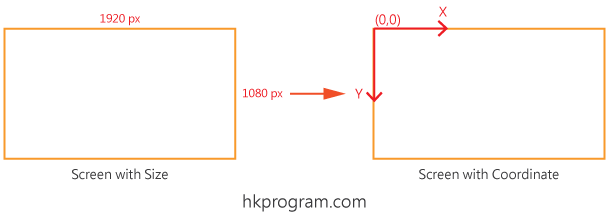
4 - Screen
Screen就是電腦屏幕,所以用的座標系統都是(右X,下Y)。
5 - OpenGL
另外,LibGDX有用到OpenGL(Open Graphics Library)來render圖像,和LibGDX Camera Viewport一樣,OpenGL用的座標系統也是(右X,上Y)。

在這裡不會詳細介紹OpenGL,以下是一些關於LibGDX和OpenGL的解釋:
OpenGL (Open Graphics Library) is a cross-language, multi-platform application programming interface (API) for rendering 2D and 3D vector graphics. The API is typically used to interact with a graphics processing unit (GPU), to achieve hardware-accelerated rendering.
LibGDX lets you go as low-level as you want, giving you direct access to file systems, input devices, audio devices and OpenGL via a unified OpenGL ES 2.0 and 3.0 interface.
libGDX uses some third-party libraries to provide its functionality. It includes OpenGL.
綜合LibGDX的World, Texture, Background, Camera, Viewport和Screen的座標系統
用LibGDX寫一個簡單程式,就可以把所有以上部分合併起來,如下圖:

例子1 (Case Study 1)
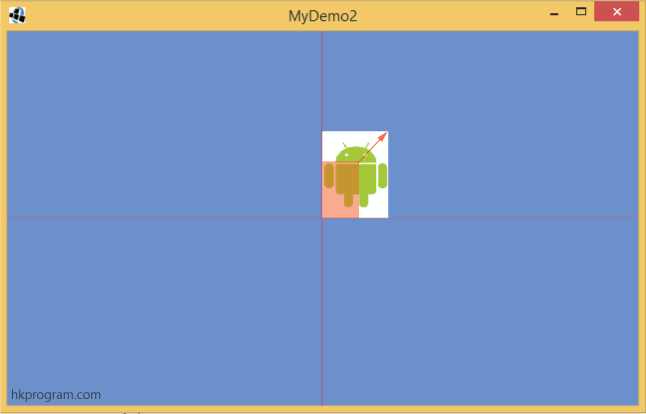
首先,用LibGDX Project Generator建立一個新的LibGDX Project-MyDemo2,如下圖:

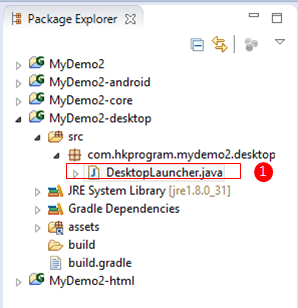
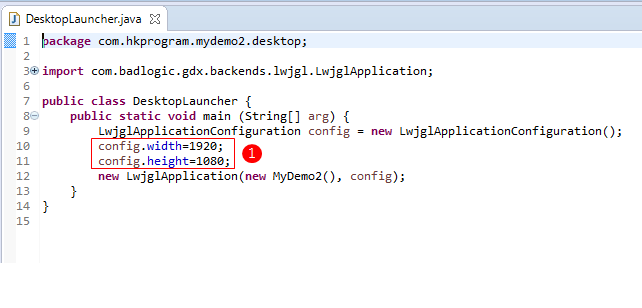
在Eclipse內,選擇MyDemo2-desktop>DesktopLauncher.java,輸入以下程式:
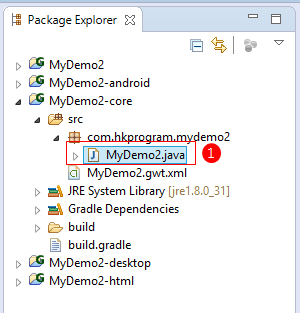
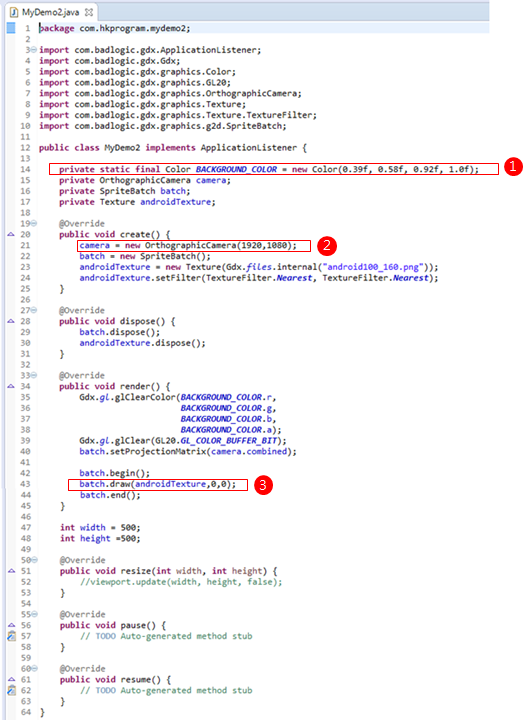
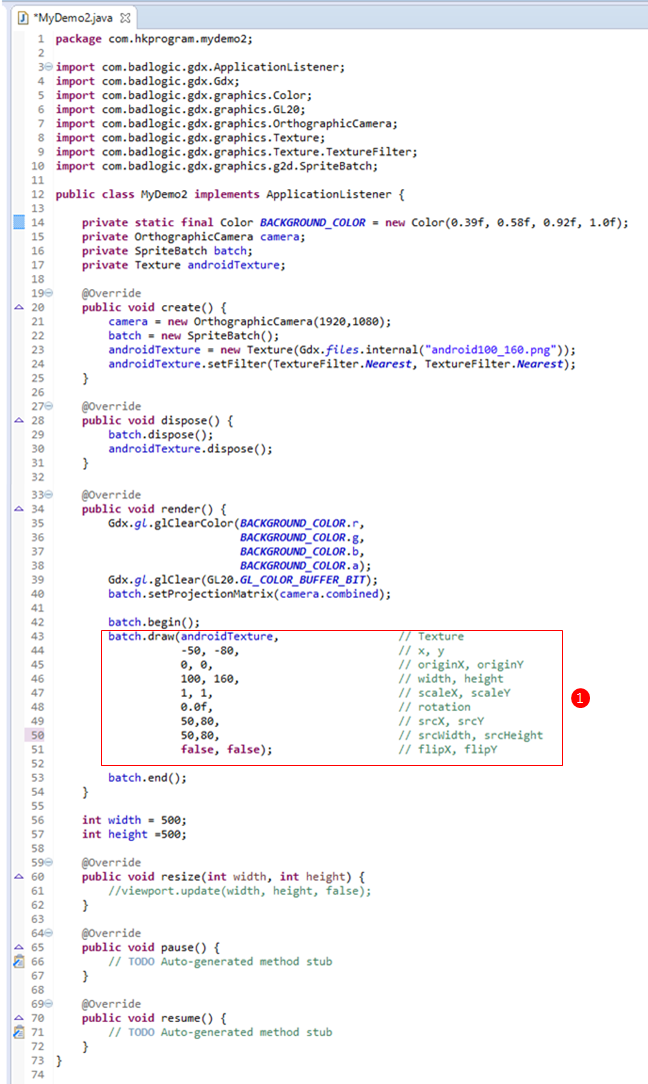
然後,在MyDemo2-core的MyDemo2.java,輸入以下程式:
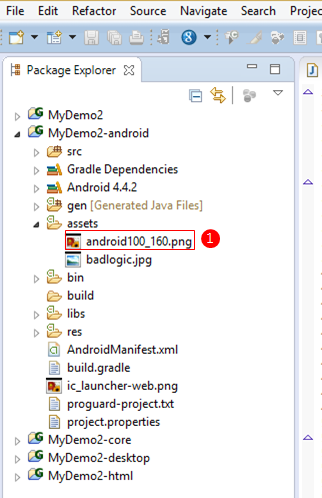
最後,要把幕前圖片(android100_160.png)複製到MyDemo2-android的assets Folder內,如下圖:
主意,幕前圖片-android100_160.png 和背景圖片-bg1920_1080.png 可在這節的尾部下載。
在MyDemo-desktop下,Right Click DesktopLauncher.java>Run As> Java Application。
在以上程式碼可以看到,主要有以下部分:
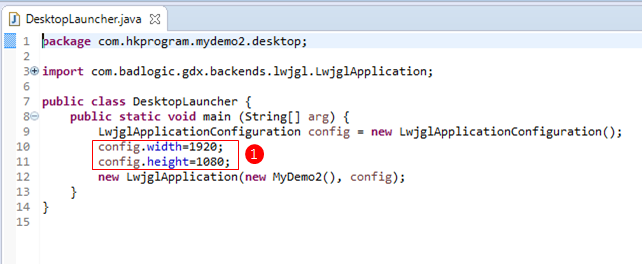
1-在DesktopLauncher.java程式內:
config.width = 1920;
config.height =1080;
以上程式config.width和config.height是用來設定電腦屏幕的大小。
2-在MyDemo2.java程式內:
private static final Color BACKGROUND_COLOR = new Color(0.39f, 0.58f, 0.92f, 1.0f);
如果我們只設定背景顏色(Background Color),而不須要背景圖片(Background Image),以上程式就用來定背景為淺藍色。
3-在MyDemo2.java程式內:
camera = new OrthographicCamera(1920,1080);
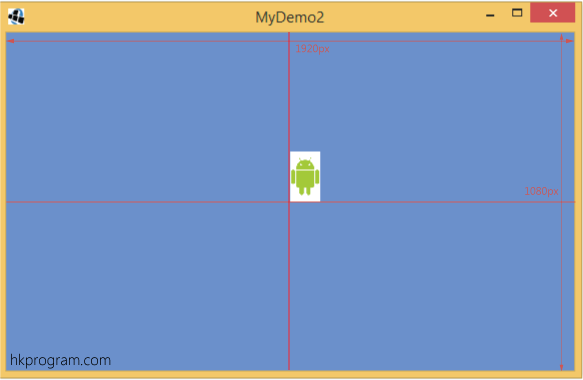
以上程式就用來設定一個Camera物件和設定Camera Viewport為1920x1080px。
注意,在這例子我們把電腦屏幕和Camera Viewport都設定為1920x1080px。
4-在MyDemo2.java程式內:
batch.draw(androidTexture,0,0);
SpriteBatch有一個物件方法(Instance method) draw(),draw() method用來顯示Texture物件在屏幕的一個位置。
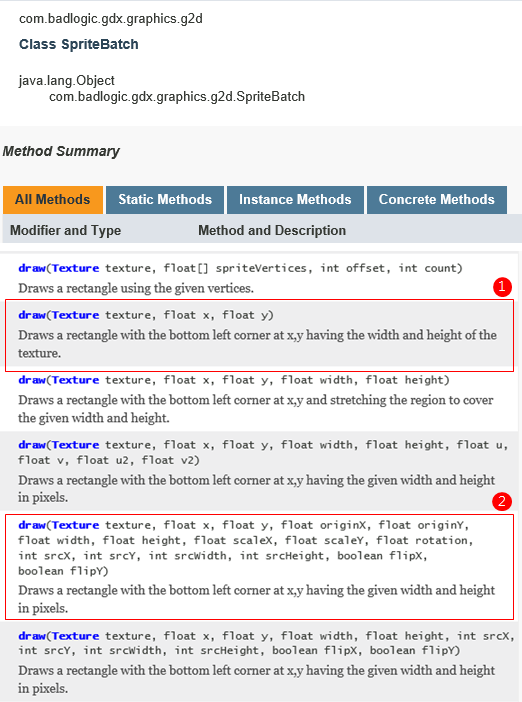
注意,SpriteBatch是一個Class,所以有一個SpriteBatch.java程式,在SpriteBatch.java程式內你可以找到不同種類的draw() method,以下會介紹兩個:
- draw(Texture texture, float x, float y);
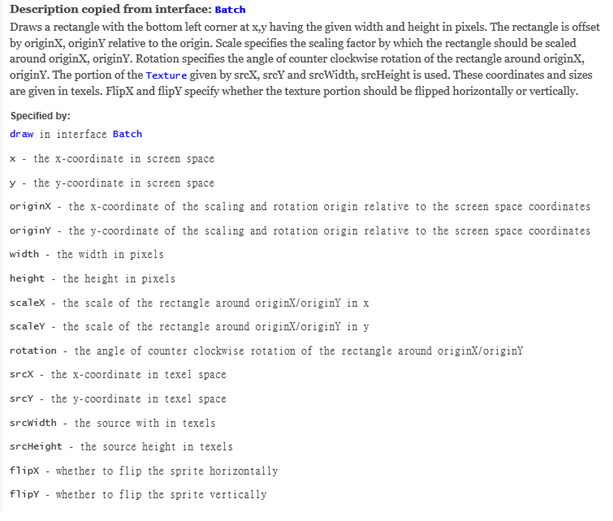
- draw(Texture texture, float x, float y, float originX, float originY, float width, float height, float scaleX, float scaleY, float rotation, int srcX, int srcY,int srcWidth, int srcHeight, boolean flipX, boolean flipY) ;
注意在同一個class內,同一個方法(method)有不同的參數(parameter),而電腦會根據參數的數目自動選擇相同數目的方法(method),這就叫做Overloading,其他章節會介紹。
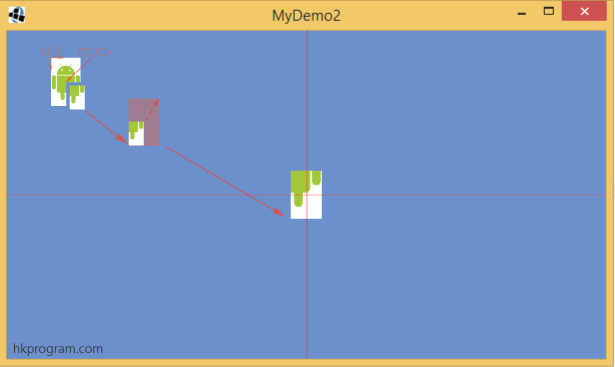
我們首先會用到第一個簡單版batch.draw(androidTexture,0,0); draw() method就會把androidTexture圖片(android100_160.png)的左下角,移到World Coordinate的中心位置(0,0)。
注意:
- 雖然圖片(Texture)的座標系統是(右X,下Y),而中心位置(0,0)預設在左上角,但是這些設定是有其他用途,draw() method會預設把圖片(Texture)的左下角移到World Coordinate的中心位置(0,0),這一點必須注意。
- 第二個詳細版batch.draw(); 會在以下其他例子加以介紹。
例子2(Case Study 2)
在這例子裏,我會設定以下batch.draw():
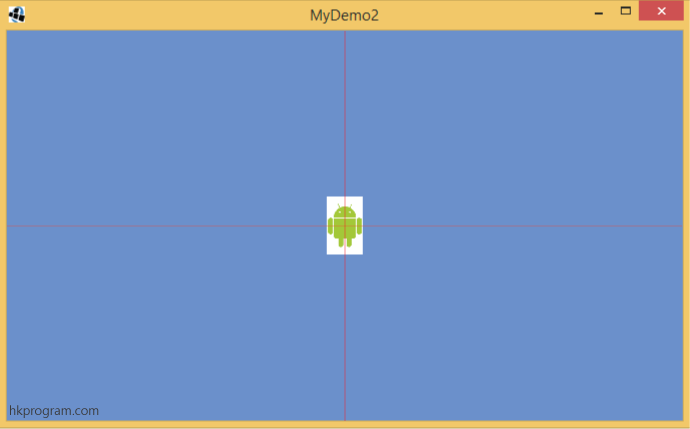
1-把幕前圖片androidTexture的中心對齊World Coordinate的中心位置(0,0)。
2-把Camera Vieport的中心對齊World Coordinate的中心位置(0,0)。
我在上面介紹LibGDX座標系統時說過,圖片(Texture) 的左下角會預設在World Coordinate的中心位置(0,0)。
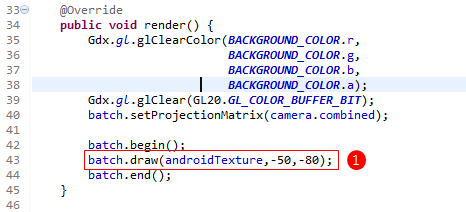
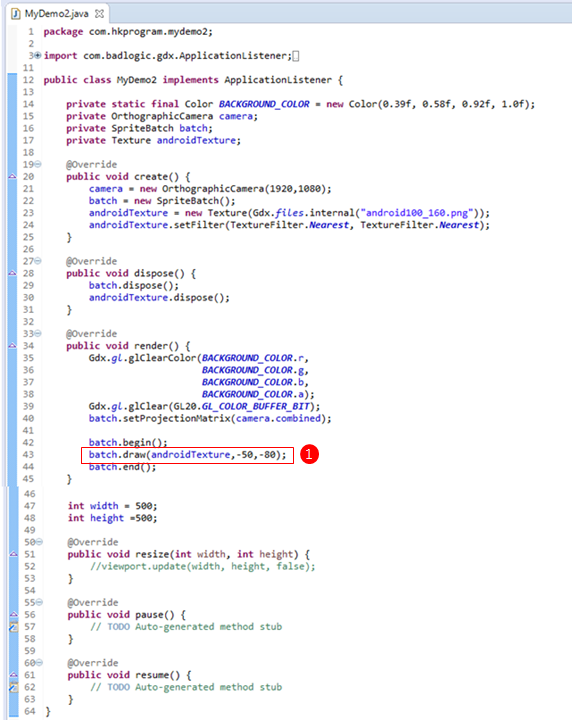
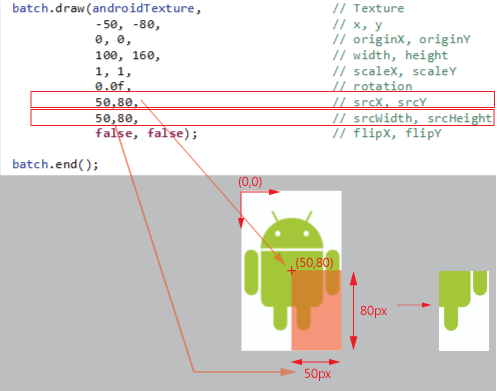
要把Texture圖片移位,我們可以用batch.draw()的簡單版,第2和第3個參數就是用來設定Texture左下角在World Coordinate的位置(x,y)。因為我們的androidTexture是100X160px,所以只要把androidTexture左移50px,下移80px(i.e. -50,-80)就可以完成圖片至中的效果。
在MyDemo2-desktop內的DesktopLauncher.java輸入以下程式:

在MyDemo2-core內的MyDemo2.java輸入以下程式:
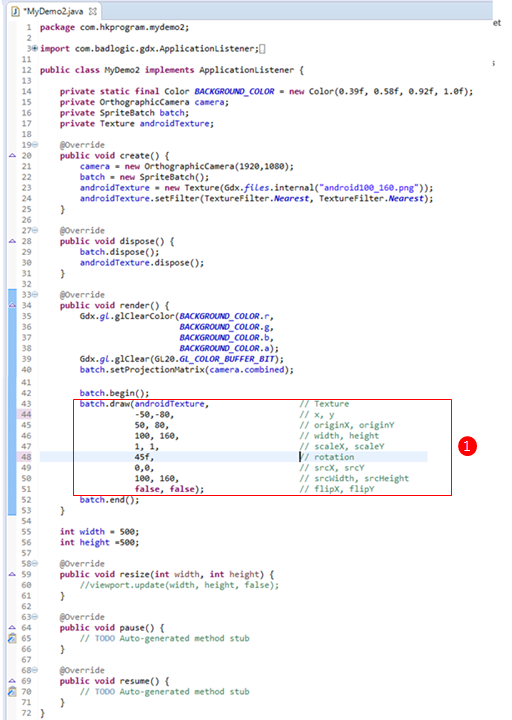
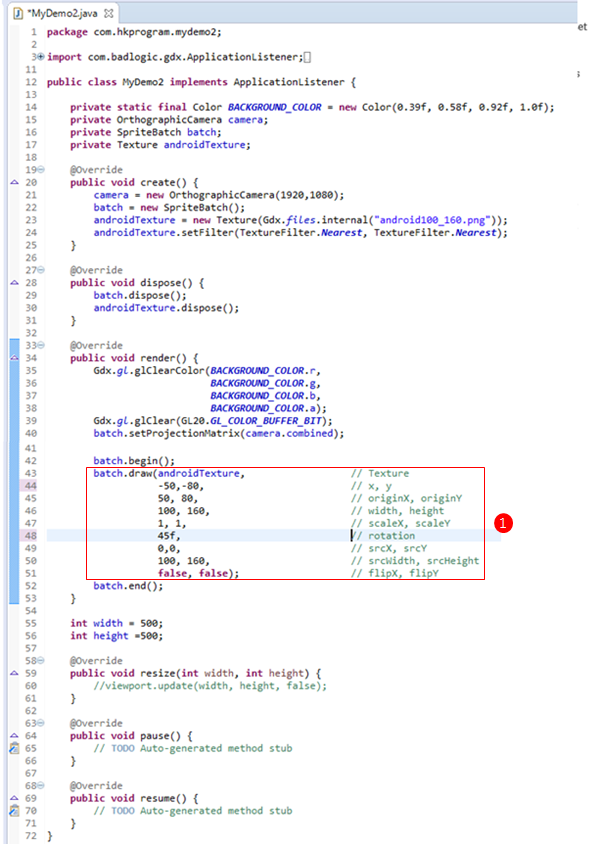
例子3(Case Study 3)
在這例子裏,我會設定以下batch.draw():
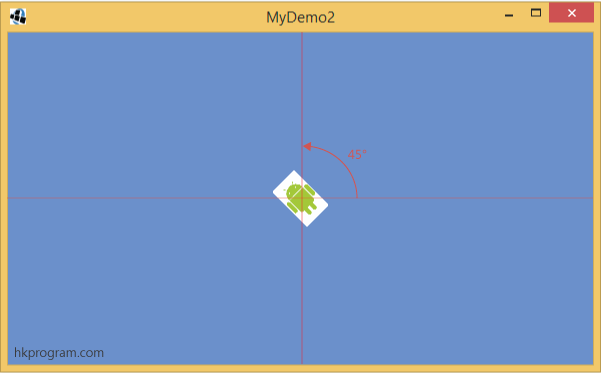
1-把幕前圖片androidTexture的中心對齊World Coordinate的中心位置(0,0)。
2-設定幕前圖片androidTexture的原點(originX,originY)在World Coordinate的中心位置(0,0)。
3-設定幕前圖片androidTexture的大小為100x160px(則原圖大小)。
4-再根據androidTexture的原點(originX,originY),把圖片逆時針旋轉45度。
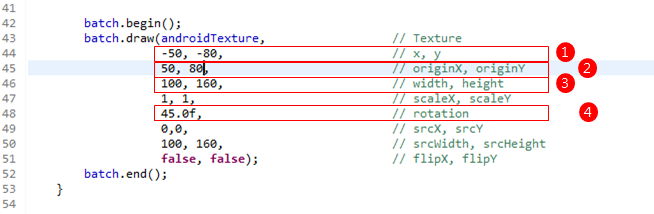
要設定androidTexture的原點(originX,originY),我們可以用batch.draw()的詳細版,第4和第5個參數就是用來設定androidTexture的原點(originX,originY)。(originX,originY)可以用來當作放大或旋轉圖片(Texture)的中心。
要設定幕前圖片androidTexture的大小,我們可以用batch.draw()的第6和第7個參數就可以改變顯示的大小。
要根據androidTexture的原點(originX,originY)把圖片逆時針旋轉45度,我們可以用batch.draw()的第10個參數。
在MyDemo2-desktop內的DesktopLauncher.java輸入以下程式:

在MyDemo2-core內的MyDemo2.java輸入以下程式:
例子4(Case Study 4)
在這例子裏,我會設定以下batch.draw():
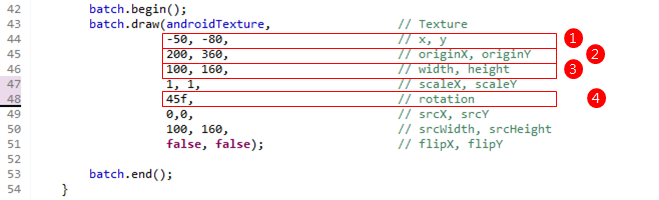
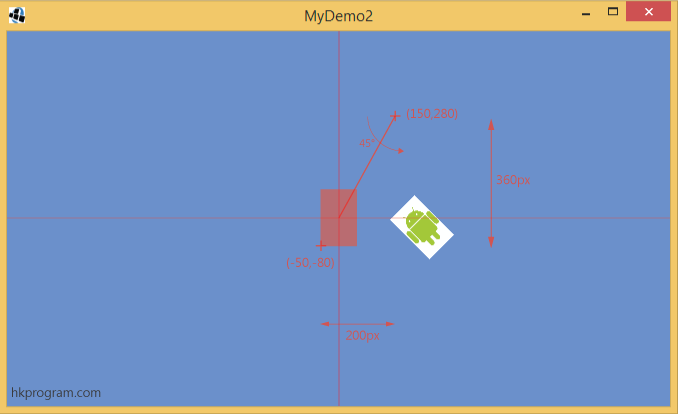
1-把幕前圖片androidTexture的中心對齊World Coordinate的中心位置(0,0)。
2-把幕前圖片androidTexture的原點(originX,originY)設定在World Coordinate的(100,200)位置。
3-設定幕前圖片androidTexture的大小為100x160px(則原圖大小)。
4-再根據androidTexture的原點(originX,originY),把圖片逆時針旋轉45度。
在MyDemo2-desktop內的DesktopLauncher.java輸入以下程式:

在MyDemo2-core內的MyDemo2.java輸入以下程式:
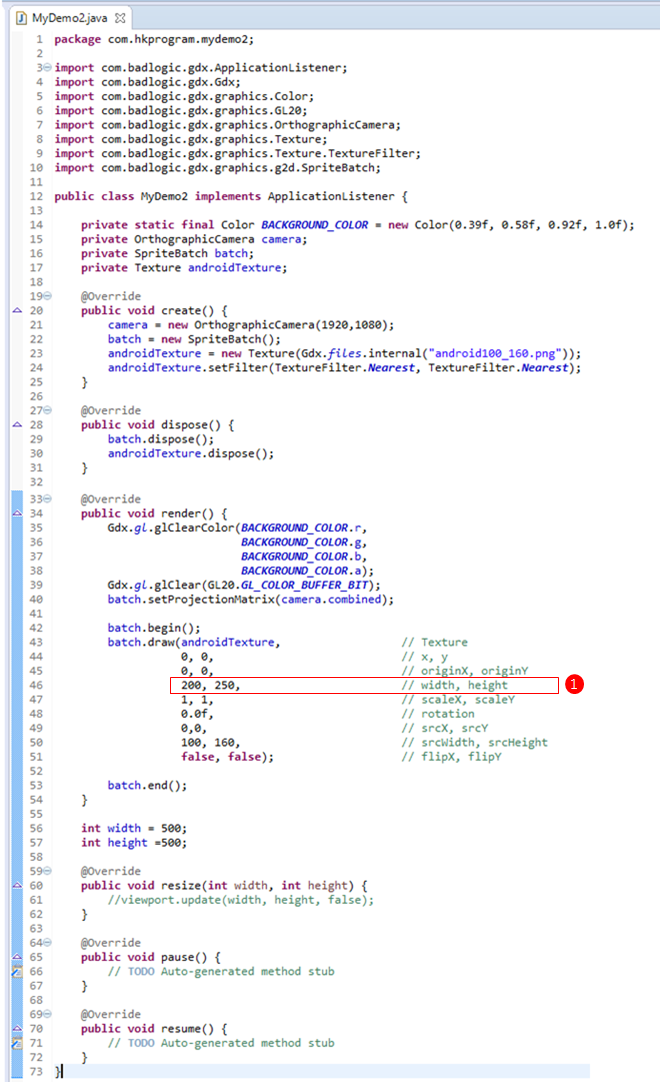
例子5(Case Study 5)
在這例子裏,我會設定以下batch.draw():

1-把幕前圖片androidTexture的中心對齊World Coordinate的中心位置(0,0)。
2-設定幕前圖片androidTexture的原點(originX,originY)在androidTexture的左下角。
3-再根據androidTexture的原點(originX,originY)把圖片由原本的100x160px放大成200x250px。
要把Texture圖片大小改變,我們可以用batch.draw()的詳細版,第6和第7個參數就是用來設定Texture的大小。
在MyDemo2-desktop內的DesktopLauncher.java輸入以下程式:

在MyDemo2-core內的MyDemo2.java輸入以下程式:
例子6(Case Study 6)
在這例子裏,我會設定以下batch.draw():
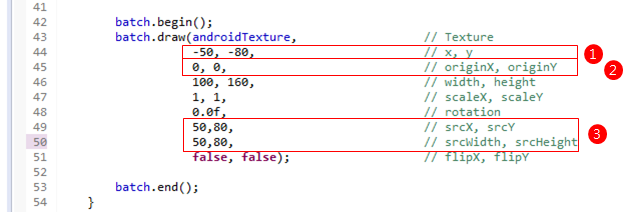
1-設幕前圖片androidTexture的原點(originX,originY)在World Coordinate的中心位置(0,0)。
2-設定幕前圖片androidTexture的大小為100x160px(則原圖大小)。
3-只顯示幕前圖片androidTexture的1/4部分(右下角的1/4)
要把Texture圖片大小改變,我們可以用batch.draw()的詳細版,第10和第11個參數就是用來設定Texture的大小。
注意,要設定圖片(Texture)顯示的區域和大小,便要用到圖片(Texture)的左上角,預設為(0,0)。
在MyDemo2-desktop內的DesktopLauncher.java輸入以下程式:

在MyDemo2-core內的MyDemo2.java輸入以下程式:
例子7(Case Study 7)
在這例子裏,我會設定以下batch.draw():
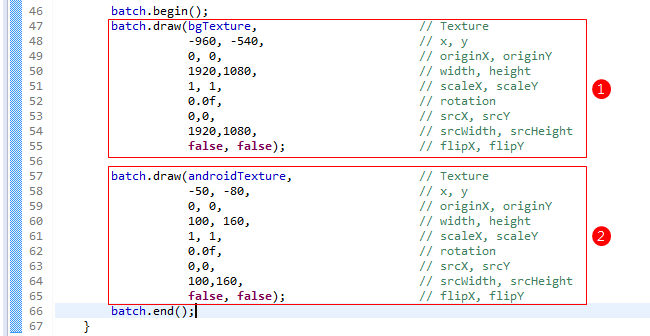
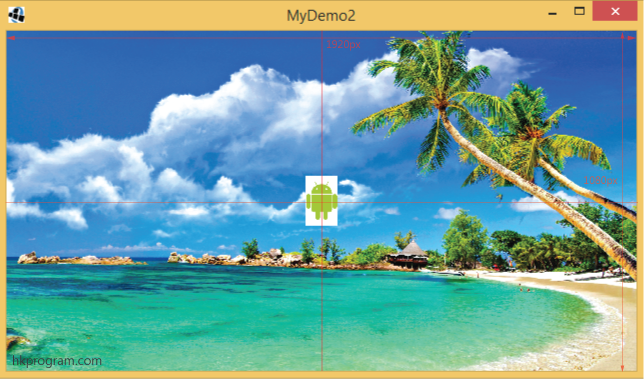
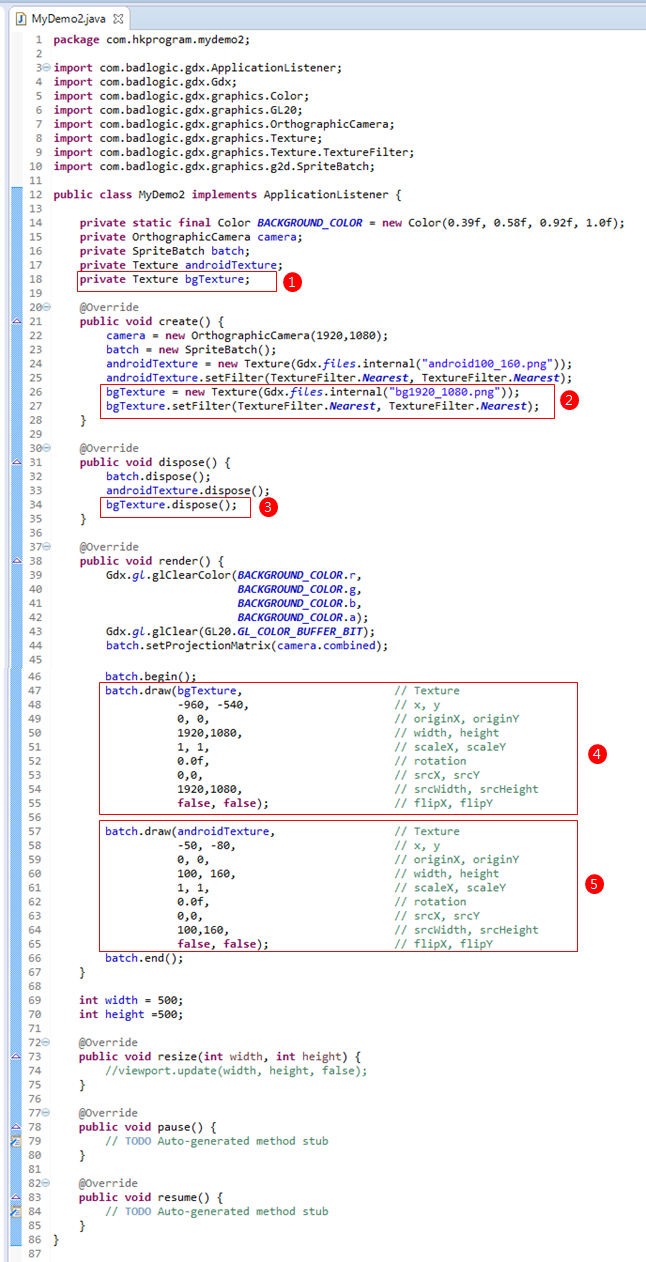
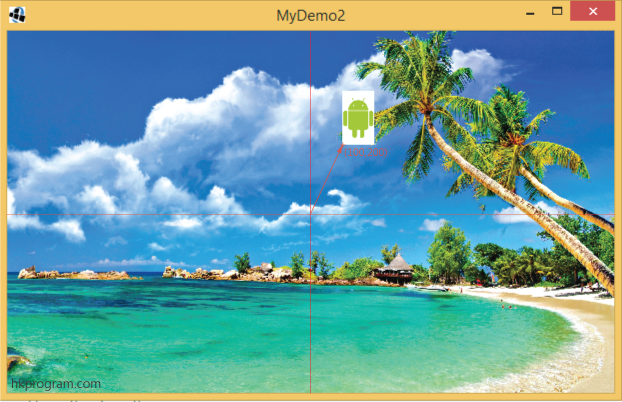
1-加入背景圖片bgTexture(bg1920_1080.png),再把bgTexture的中心對齊World Coordinate的中心位置(0,0)。
2-把幕前圖片androidTexture的左下角位置移到World Coordinate的中心位置(0,0)。
注意:
1-不要忘記把背景圖片(bg1920_1080.png)複製到MyDemo2-android內的assets Folder內。
2-我們必須把batch.draw(bgTexture,....)放在batch.draw(androidTexture,....)之前,因為程式會根據batch.draw()的次序把圖片顯示在屏幕上,如果把batch.draw(androidTexture,....)放在前,androidTexture就會被bgTexture覆蓋。
3-除了batch.draw()外,不要忘記加入例如private Texture bgTexture; 在dispose()內加入bgTexture.dispose();等等,詳細請參考以下程式。
在MyDemo2-desktop內的DesktopLauncher.java輸入以下程式:

在MyDemo2-core內的MyDemo2.java輸入以下程式:
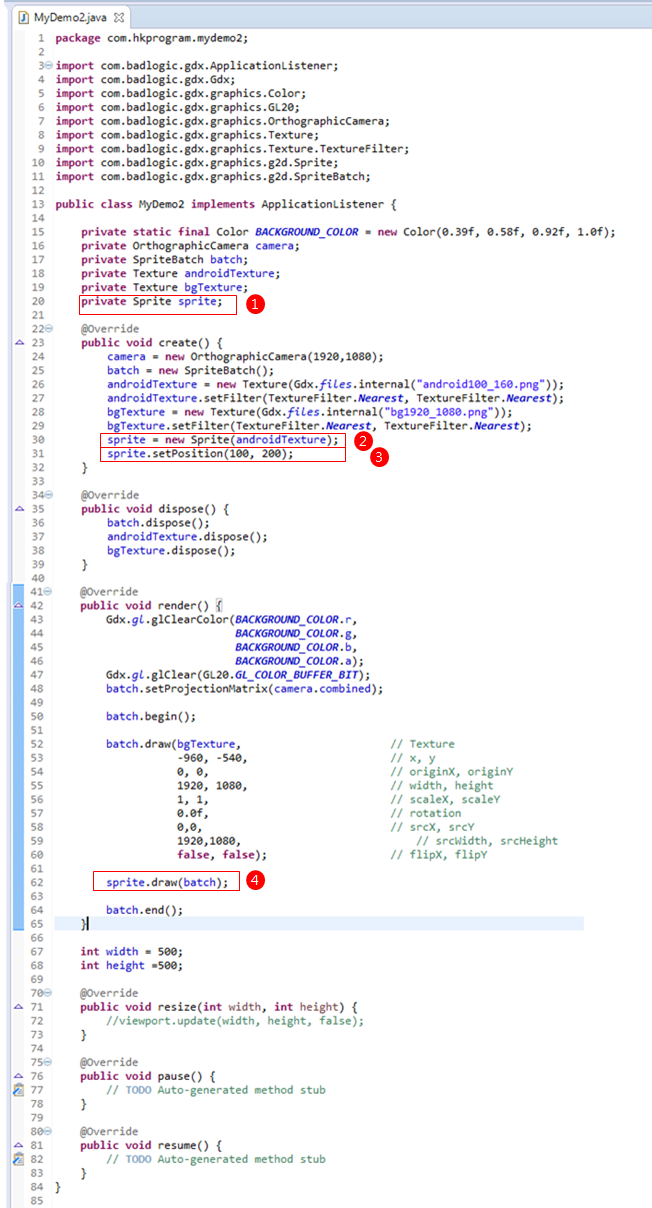
例子8(Case Study 8)
在這例子裏,我會用另一個Class叫Sprite,Sprite物件也有draw() method。
我會在第12節 - SpriteBatch & Sprite介紹SpriteBatch和Sprite的分別,這裡不會詳細介紹。

1-加入背景圖片bgTexture(1920x1080px),再把bgTexture的中心對齊World Coordinate的中心位置(0,0)。
2-把幕前圖片androidTexture的左下角位置移到World Coordinate的(100,200)位置。
注意,不要忘記把背景圖片(bg1920_1080.png)複製到MyDemo2-android內的assets Folder內。
在MyDemo2-desktop內的DesktopLauncher.java輸入以下程式:
在MyDemo2-core內的MyDemo2.java輸入以下程式:
例子9(Case Study 9)
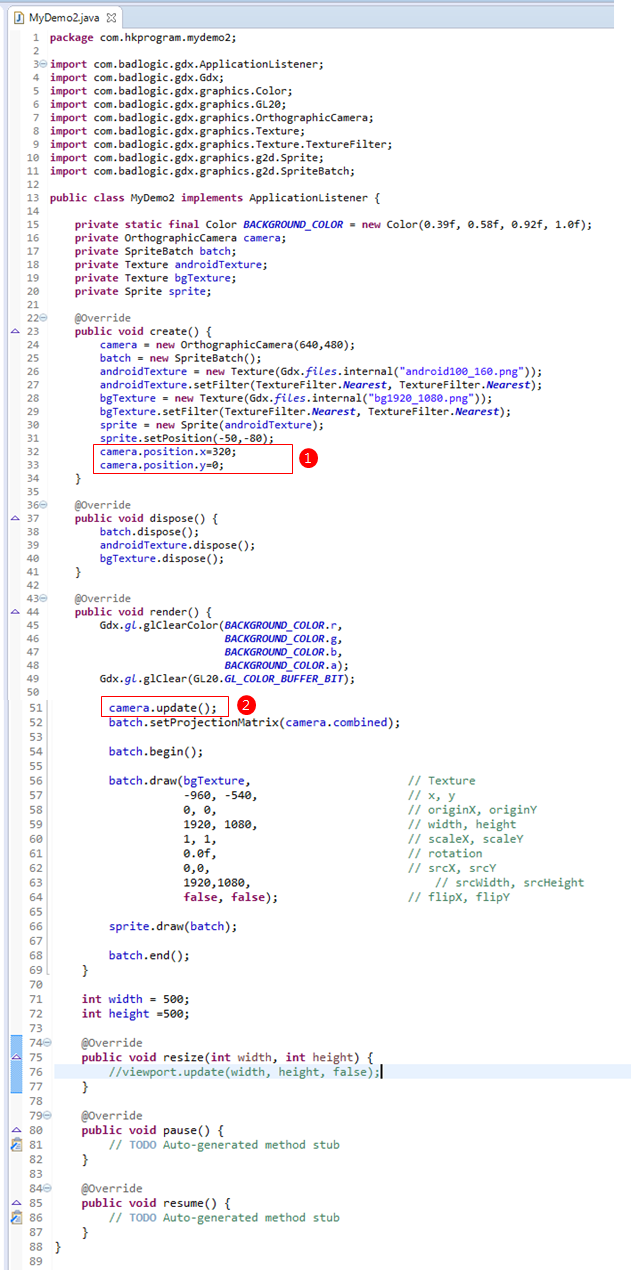
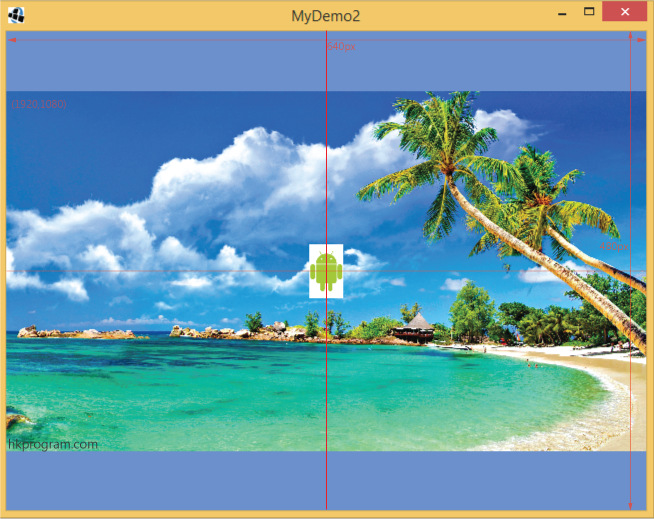
在這例子裏,我會設定Camera Position:
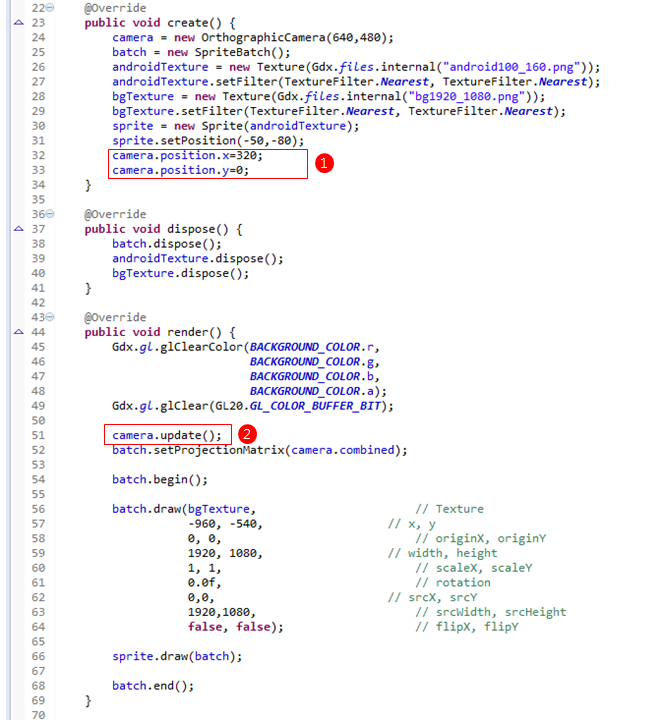
1-把Camera由World Coordinate的中心位置(0,0)右移320px則(320,0)。
camera.position.x=320;
camera.position.y=0;
還要在render()內update camera:
camera.update();
在MyDemo2-desktop內的DesktopLauncher.java輸入以下程式:
在MyDemo2-core內的MyDemo2.java輸入以下程式:
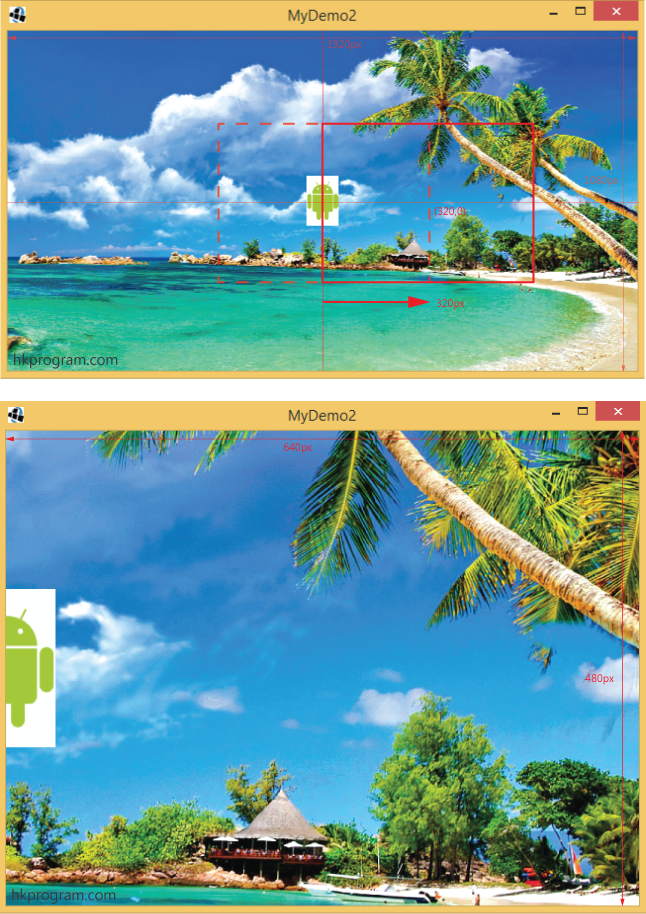
例子10(Case Study 10)
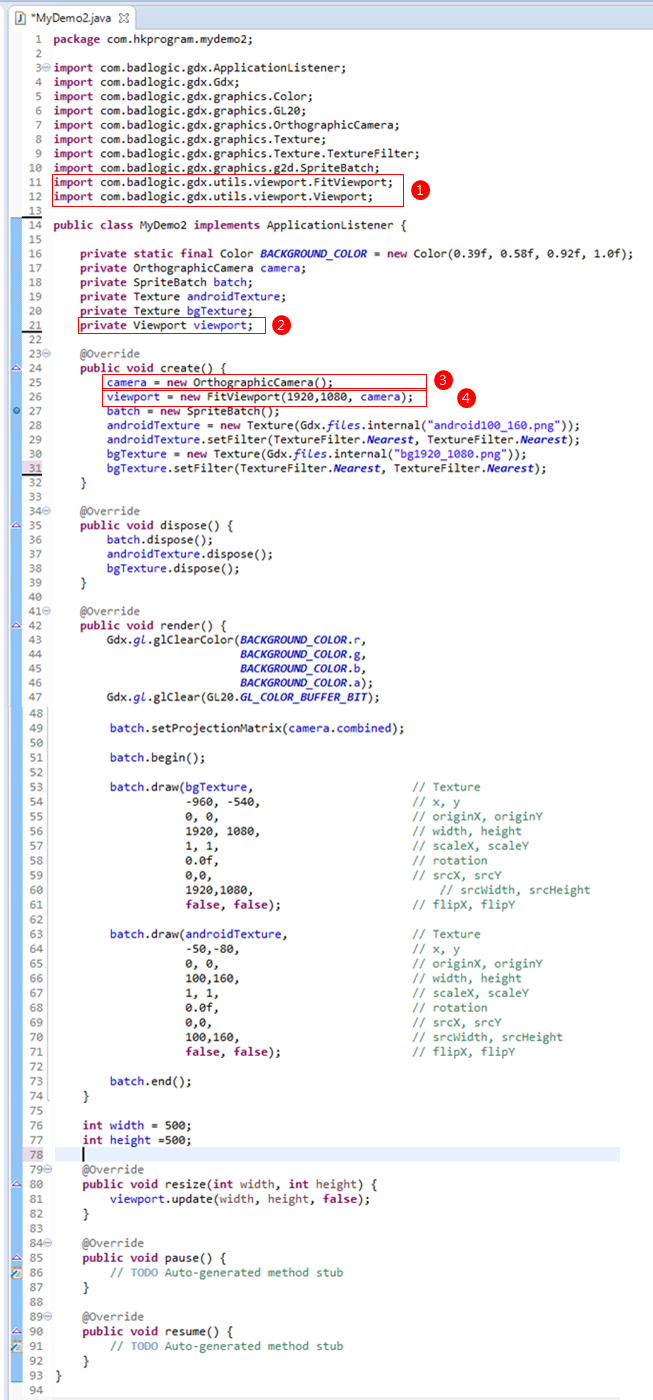
在這例子裏,我會用一個FitViewport Class:

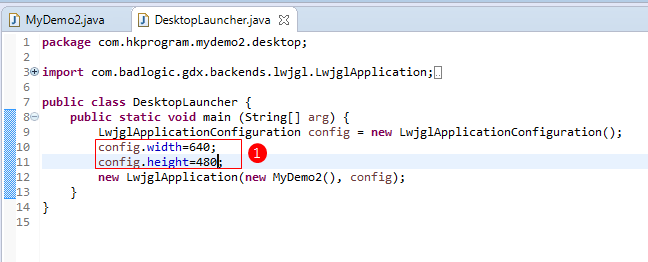
在MyDemo2-desktop內的DesktopLauncher.java輸入以下程式:

1-FitViewport可以把1920x1080px的背景圖片(bgTexture)顯示在640x480px的屏幕上,而保留原本的比例(Aspect Ratio)。
在MyDemo2-core內的MyDemo2.java輸入以下程式: